Wiz Red Velvet Cake
Posted on December 29, 2023
0 Comments
Share this recipe
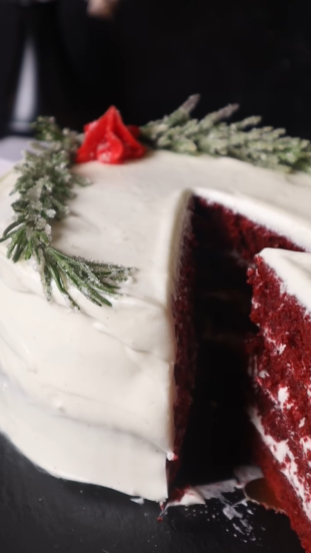

Wiz Red Velvet Cake
Rate This Recipe!
CAKE
- 1/2 cup freshly brewed hot coffee
- 1/4 cup unsweetened cocoa powder
- 2 1/4 cups all-purpose flour
- 1/2 tsp baking powder
- 1 tsp baking soda
- 1 tap fine sea salt
- 2 cups granulated sugar
- 1/2 cup vegetable oil
- 1/2 cup (1 stick) unsalted butter, melted
- 2 large eggs, at room temperature
- 1 large egg yolk, at room temperature
- 1 cup buttermilk, at room temperature
- 2 tsp high-quality vanilla paste
- 3 tsp natural red food coloring gel (optional; for a pinker hue, substitute with beet coloring)
- 1 tsp white vinegar
Frosting
- 8 ounces cream cheese, softened
- 1/2 cup (1 stick) unsalted butter, softened
- 1 tsp high-quality vanilla paste
- 1/2 tsp fine sea salt
- 2 cups powdered sugar, sifted
Cake
- Preheat oven to 325°F . Line and grease three 8-inch cake pans.
- Mix cocoa powder with hot coffee; set aside.
- Sift flour, baking powder, baking soda, and salt.
- In a large bowl, whisk sugar, oil, and butter. Add eggs and yolk, mixing after each.
- Mix in buttermilk, vanilla paste, food coloring, vinegar, and coffee mixture.
- Fold dry ingredients into wet in three parts.
- Divide batter into pans, tap to remove air bubbles.
- Bake 25-30 minutes until a tester comes out clean.
- Cool cakes in pans for 10 minutes, then transfer to wire racks to cool fully.
Frosting
- Beat cream cheese and butter in a large bowl until smooth and creamy. Add vanilla paste, then gradually beat in sifted
- powdered sugar until fluffy (about 3 minutes). Adjust thickness with milk or extra powdered sugar as needed.
Assembly
- Level cooled cakes if needed. Start with the first layer on your cake stand.
- Apply frosting on top, then add the next layer. Repeat with all layers.
- Frost the outside to your preference and decorate.

Hey! It’s Ronica!
This is where I love to share my passion for cooking, baking, and flavor. When I’m not creating delicious recipes, you’ll find me spending time with my family, working on my spice blends at Flora & Mana, or enjoying a homemade baked goods. Join me on this culinary journey to taste, healthy meals and fun kitchen hacks!
Read More About RonicaConnect with Us on Social Media:
Recommended For You:
More Recipes You'll Love!
We'd Love to Hear from you!
Drop a Comment Below!
Leave a Reply
Stay in
the know
Subscribe now to get exclusive recipes, kitchen tips, and cooking inspiration delivered straight to your inbox.
Elevate your meals and never miss a delicious update!




No comments yet