Salted Caramel Chocolate Brownies
Posted on February 13, 2026
0 Comments
Share this recipe
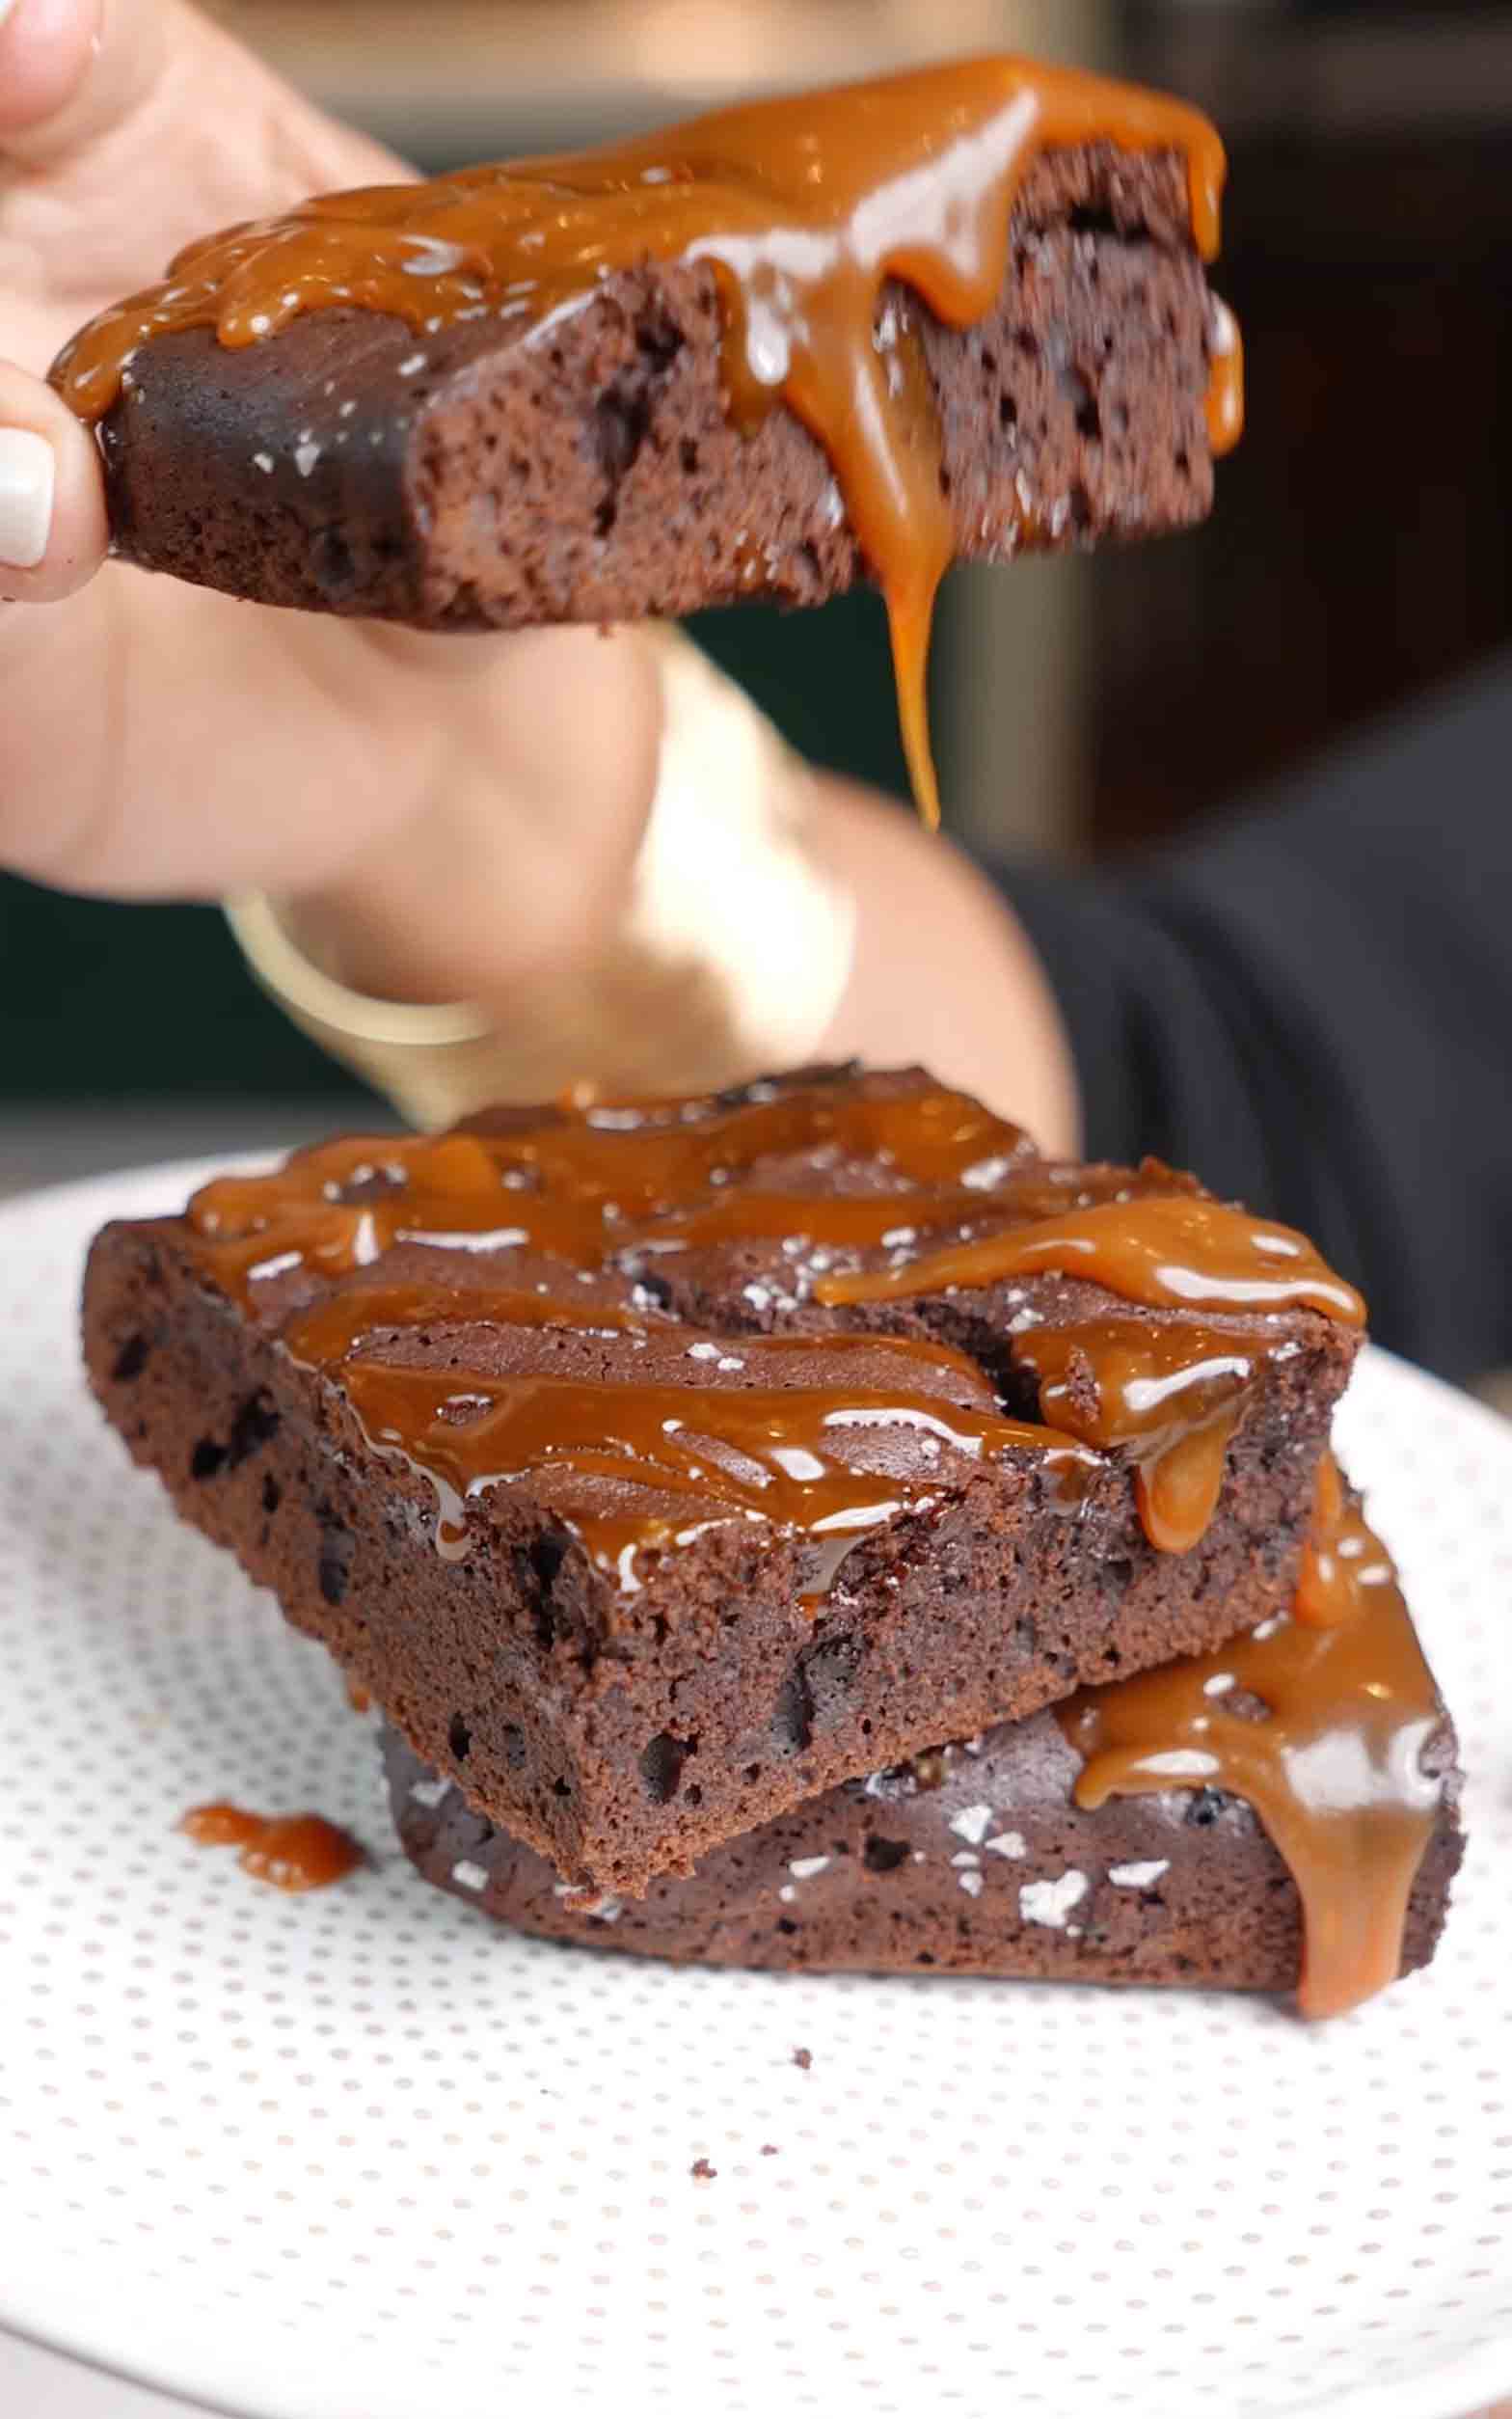
These salted caramel chocolate brownies are the most indulgent, deeply chocolatey brownies you'll ever make, and they're about to ruin all other brownies for you forever! These aren't your average box mix brownies. Every single element has been thought through to create maximum chocolate flavor and that perfect fudgy, dense texture that makes a truly exceptional brownie. It starts with browned butter, which adds this incredible nutty, caramel-like depth that you just can't get from regular melted butter. The hot browned butter gets poured directly over a mixture of good quality chopped semisweet chocolate, cocoa powder, and espresso powder, which melts everything together and creates this intensely rich chocolate base. The espresso powder doesn't make the brownies taste like coffee at all, it just amplifies and deepens the chocolate flavor in a way that's truly magical. You beat eggs with both cane sugar and dark brown sugar along with vanilla bean paste for a full 10 minutes until the mixture is thick, pale, and fluffy. This step creates that signature crinkly, shiny brownie top that everyone loves. The chocolate mixture gets folded in, then sifted flour and the remaining cocoa powder go in along with milk chocolate chips for extra pockets of melty chocolate throughout. Here's where the technique gets really interesting: you bake the brownies for 18 minutes, take the pan out, drop it on the counter a couple of times to slightly deflate them, sprinkle with flaky sea salt, then return them to the oven for another 18-20 minutes. This two-stage baking method creates an incredibly fudgy center while ensuring the edges are perfectly set. Once completely cool, you lift them out using the parchment overhang, drizzle generously with homemade salted caramel, and cut into 24 bars. The combination of rich, fudgy chocolate, flaky sea salt, and that golden, buttery salted caramel drizzle is absolutely next level. Serve them as is or with a scoop of vanilla ice cream or a cloud of whipped cream for the ultimate dessert experience!
Frequently Asked Questions
Q: Why do I need to drop the pan on the counter during baking?
A: This technique is the secret to getting that perfectly fudgy, dense brownie texture! When you drop the pan on the counter after the first 18 minutes of baking, you deflate any air bubbles that have built up in the batter. This prevents the brownies from becoming cakey and light, keeping them dense and fudgy in the center. It also helps create that beautiful crinkly, shiny top that's the hallmark of a truly exceptional brownie. It feels a little scary the first time you do it, but trust the process! One or two firm drops is all you need.
Q: Why beat the eggs and sugar for a full 10 minutes?
A: This technique is the secret to getting that perfectly fudgy, dense brownie texture! When you drop the pan on the counter after the first 18 minutes of baking, you deflate any air bubbles that have built up in the batter. This prevents the brownies from becoming cakey and light, keeping them dense and fudgy in the center. It also helps create that beautiful crinkly, shiny top that's the hallmark of a truly exceptional brownie. It feels a little scary the first time you do it, but trust the process! One or two firm drops is all you need.
Q: How do I know when the brownies are done?
A: These brownies are meant to be fudgy, so the standard toothpick test doesn't apply here! A wooden skewer inserted into the center should come out with some fudgy, moist crumbs clinging to it, not completely clean. If it comes out with wet, liquid batter, they need more time. If it comes out completely clean with no crumbs, they're overbaked and will be cakey instead of fudgy. The edges should look set and slightly pulled away from the sides of the pan while the center should still look slightly underdone. They'll firm up as they cool completely, so resist the urge to overbake!
Q: Can I skip the espresso powder?
A: You can, but I really recommend keeping it in! Espresso powder is a baker's secret weapon for chocolate desserts. It doesn't make your brownies taste like coffee at all, instead it intensifies and deepens the chocolate flavor in a way that's hard to achieve otherwise. If you absolutely can't have caffeine or don't have it on hand, you can leave it out and the brownies will still be delicious. Just know that with it, the chocolate flavor is noticeably richer and more complex. It's available at most grocery stores in the baking aisle or coffee section.
These salted caramel chocolate brownies are deeply fudgy, intensely chocolatey, and absolutely irresistible! Made with browned butter, chopped semisweet chocolate, espresso powder, and two types of sugar, baked using a two-stage method for the perfect fudgy center. Finished with flaky sea salt and homemade salted caramel drizzle. Pure brownie perfection!
Rate This Recipe!
Preparations
Prep Time:
25 minutes
Cook Time:
36-38 minutes
Total Time:
1 hour (plus cooling time)
Cuisine:
American
Course:
Dessert
Calories:
280 kcal (approx. per brownie)
Servings:
24 brownies
Author:
Ronica Rupan
Ingredients
Ingredients
For the Brownies:
- 1¼ cups unsalted butter (for browning)
- 8 ounces good-quality semisweet chocolate, chopped
- ¾ cup cocoa powder, divided (¼ cup + ½ cup)
- 1 tablespoon espresso powder
- 1¼ cups cane sugar
- ½ cup packed dark brown sugar
- 2 teaspoons vanilla bean paste
- 1 teaspoon kosher salt
- 6 large eggs
- 1 cup all-purpose flour
- ½ cup milk chocolate chips
- Flaky sea salt, for sprinkling
For Serving:
- Salted caramel sauce, for drizzling
- Vanilla ice cream or whipped cream (optional)
Instructions
- Preheat and Prep the Pan Preheat your oven to 350°F (180°C). Take softened butter and generously grease a 9x13-inch dark metal baking pan. Line the pan with parchment paper, leaving a generous overhang on all sides (this is how you'll lift the brownies out later). Grease the parchment paper with more softened butter. Set aside.
- Create the Chocolate Base Place the chopped semisweet chocolate, ¼ cup of the cocoa powder, and the espresso powder in a heatproof bowl or large measuring cup. Set aside.
- Brown the Butter In a small saucepan, melt the butter over medium heat. Continue cooking, stirring occasionally, until the butter foams, then the foam subsides, and small golden-brown bits start to appear on the bottom of the pan. The butter should smell nutty and caramel-like. This takes about 5-7 minutes total. Watch it carefully because it can go from perfectly browned to burnt quickly! As soon as it's golden and fragrant, immediately pour the hot browned butter directly over the chocolate mixture. Whisk vigorously until the chocolate is completely melted and the mixture is smooth and glossy. Set aside to cool slightly.
- Beat the Eggs and Sugars In a large bowl using a stand mixer or hand mixer on medium-high speed, beat together the cane sugar, dark brown sugar, vanilla bean paste, salt, and eggs for a full 10 minutes. Don't skip or rush this step! The mixture should become very thick, pale, and fluffy, almost triple in volume. When you lift the beaters, it should fall in thick ribbons that hold their shape on the surface for a few seconds. This is what creates that gorgeous shiny, crinkly brownie top.
- Combine Chocolate and Egg Mixtures Pour the slightly cooled chocolate and browned butter mixture into the egg and sugar mixture. Using your mixer on low speed or a spatula, fold and blend until completely smooth and well combined. Scrape down the sides of the bowl to make sure everything is incorporated.
- Add Flour and Chocolate Chips Sift the remaining ½ cup of cocoa powder and the all-purpose flour directly into the batter. Add the milk chocolate chips. Using a rubber spatula, gently fold everything together with big sweeping motions from the bottom of the bowl up until just combined with no dry streaks remaining. Don't overmix!
- Bake the First Round Pour the batter into your prepared pan and spread it into an even layer using an offset spatula. Bake for 18 minutes until the top starts to look slightly puffed and set around the edges.
- The Drop Technique Carefully remove the pan from the oven and place it on a flat, heatproof surface. Hold the pan about 3-4 inches above the surface and drop it firmly 1-2 times. You'll see the center deflate slightly. Immediately sprinkle flaky sea salt generously and evenly over the entire surface.
- Finish Baking Return the pan to the oven and bake for an additional 18-20 minutes. The brownies are done when a wooden skewer inserted into the center comes out with fudgy, moist crumbs (not wet batter, but definitely not clean). The edges should be set and the center should still look very slightly underdone.
- Cool Completely Transfer the pan to a wire cooling rack and let the brownies cool completely in the pan. This is crucial and takes about 1-2 hours. Don't rush it! If you cut into them while warm, they'll be too soft and won't hold their shape.
- Cut and Serve Once completely cool, use the parchment paper overhang to lift the entire slab of brownies out of the pan onto a cutting board. Drizzle generously with salted caramel sauce in a zigzag pattern over the top. Cut into 24 bars using a sharp knife, wiping the blade clean between cuts for the neatest edges. Serve as is or with a scoop of vanilla ice cream or a dollop of whipped cream!
More Recipes


Connect with Us on Social Media:

Hey! It’s Ronica!
This is where I love to share my passion for cooking, baking, and flavor. When I’m not creating delicious recipes, you’ll find me spending time with my family, working on my spice blends at Flora & Mana, or enjoying a homemade baked goods. Join me on this culinary journey to taste, healthy meals and fun kitchen hacks!
Read MoreWe'd Love to Hear from you!
Drop a Comment Below!
Leave a Reply
Get recipes first!
Subscribe now to get exclusive recipes, kitchen tips, and cooking inspiration delivered straight to your inbox.
No comments yet