3-Ingredient High-Protein Cottage Cheese Cheesecake
Posted on May 21, 2026
3 Comments
Share this recipe
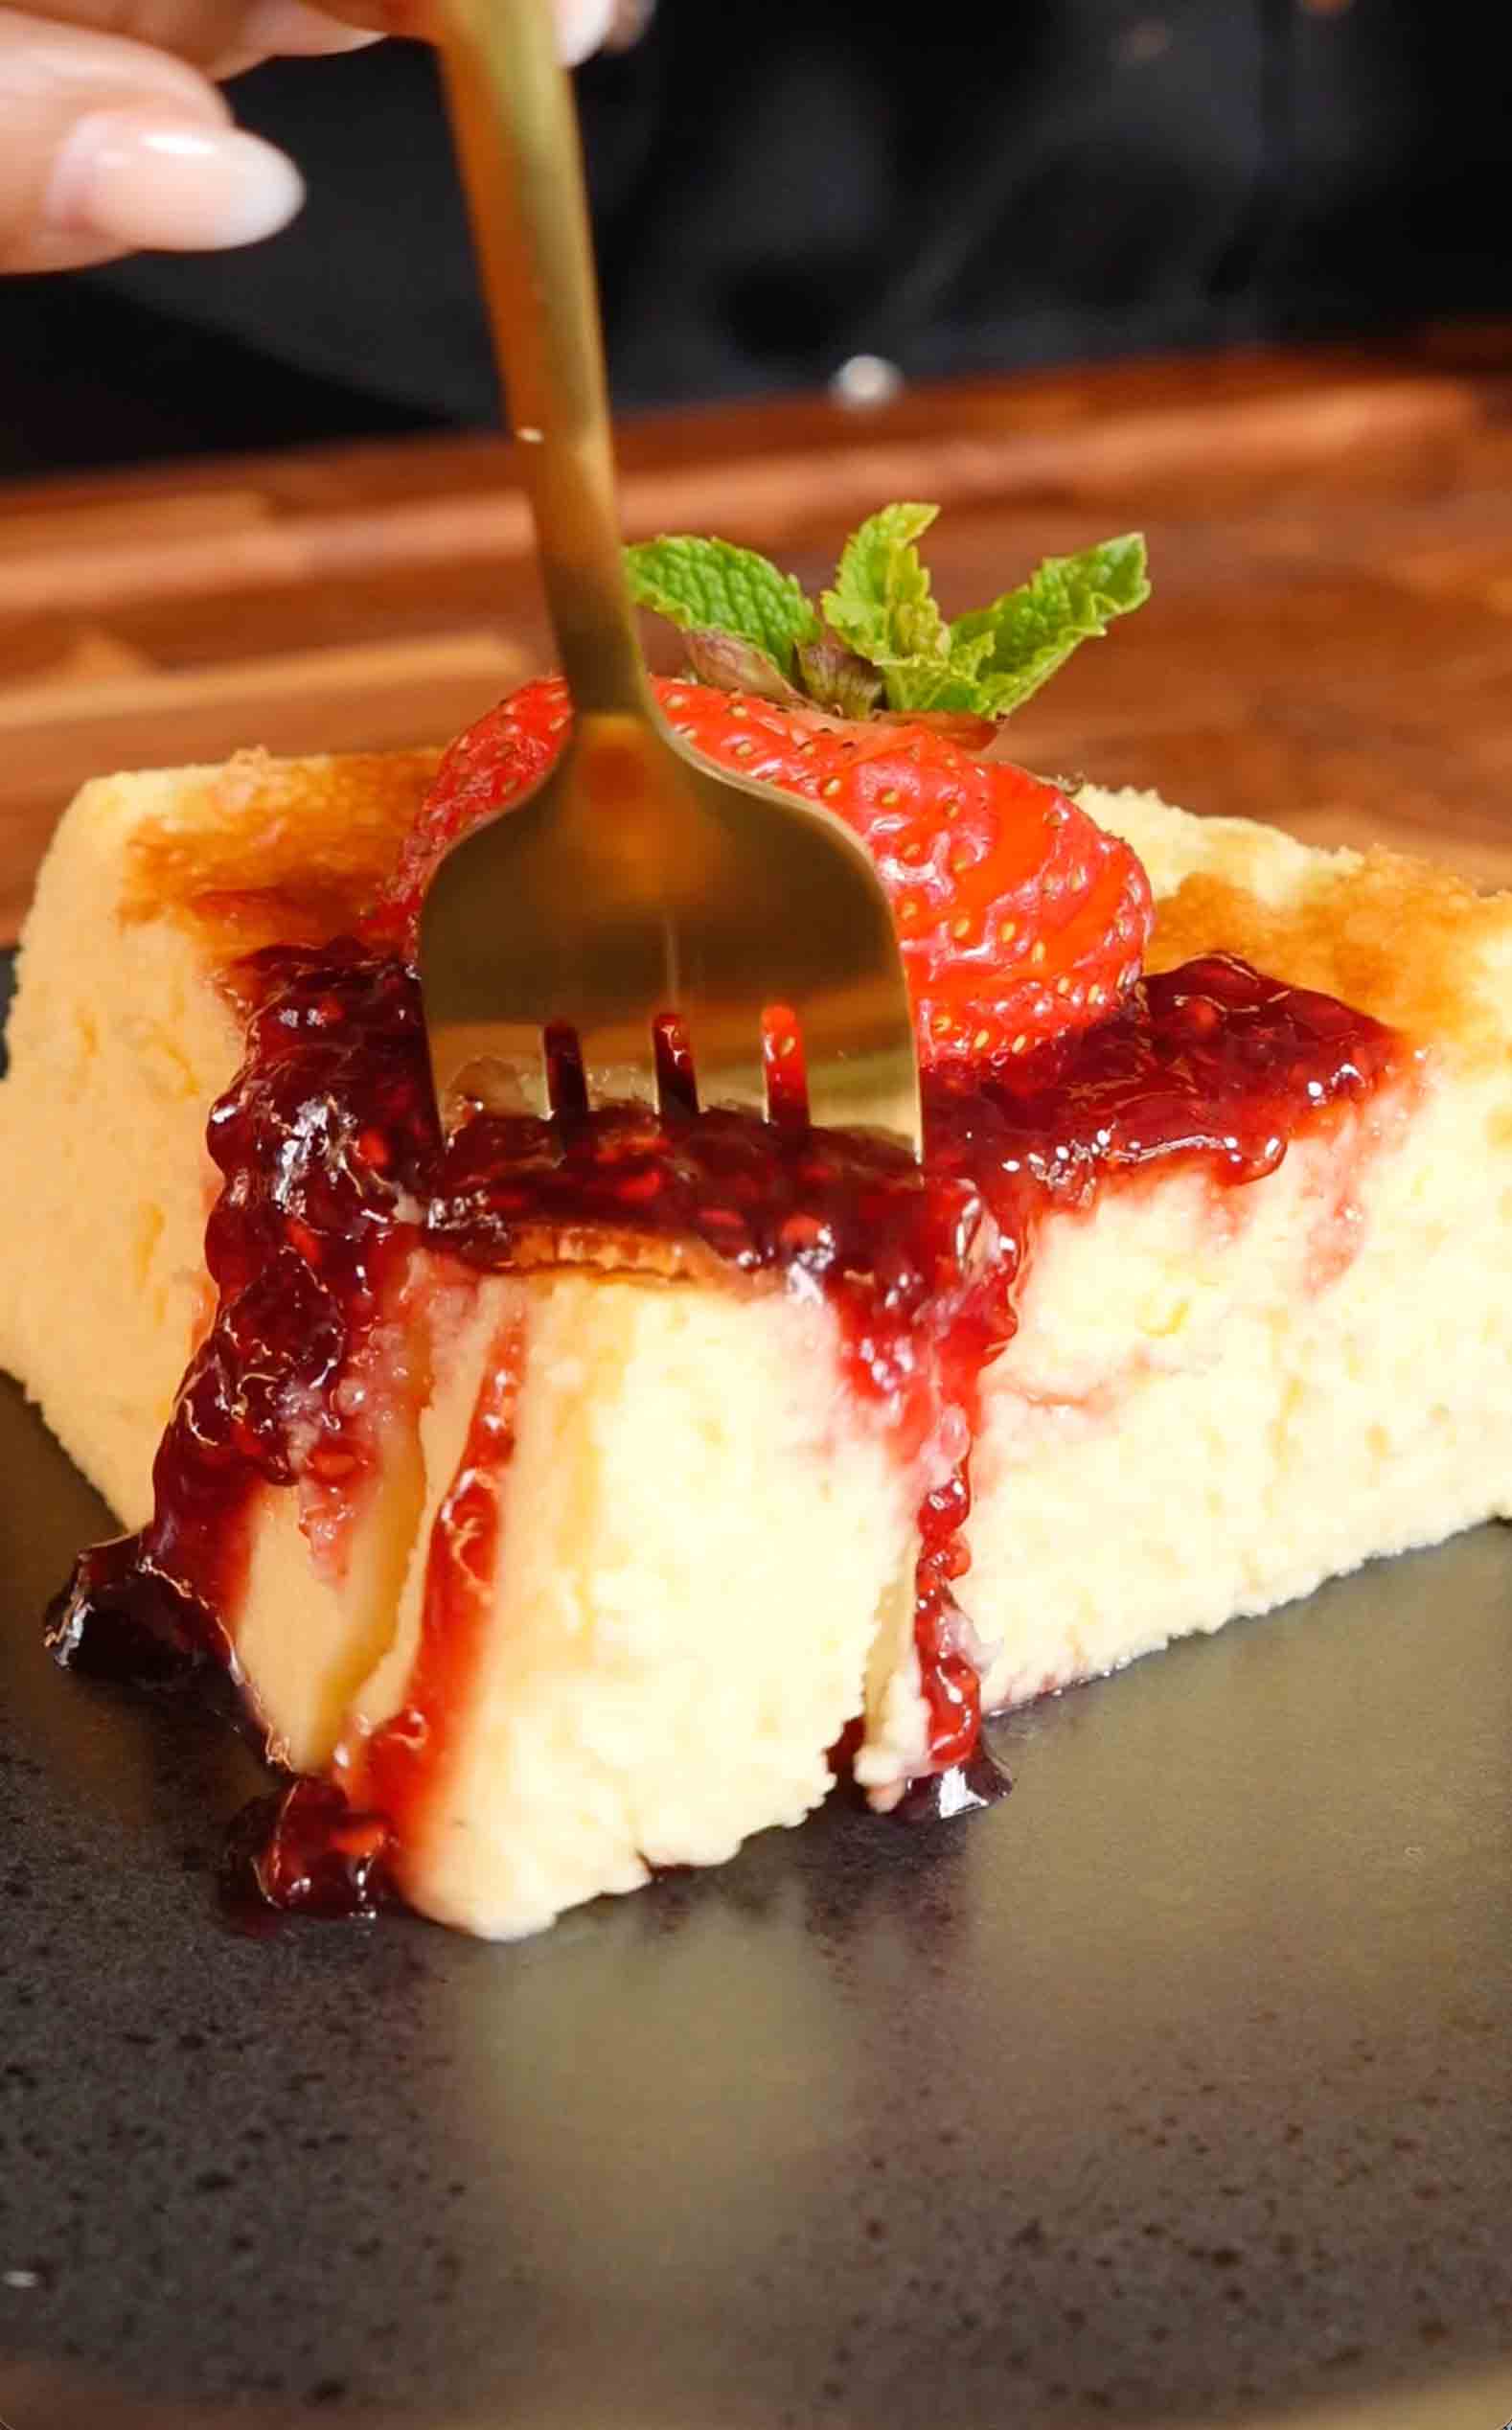
This 3-ingredient high-protein cottage cheese cheesecake is pure magic! With just white chocolate chips, cottage cheese, and eggs, you get the most creamy, decadent, protein-packed cheesecake that tastes like it came from a fancy bakery. The secret? Blending the cottage cheese until it's completely smooth and silky, which eliminates any graininess and creates that luxurious cheesecake texture. White chocolate chips get melted and blended into the cottage cheese and eggs, adding sweetness and richness without any added sugar. The cheesecake bakes in a water bath, which ensures even, gentle cooking and prevents cracking. After 50-60 minutes in the oven, the cheesecake comes out with set edges and a slightly jiggly center (about 1 inch in diameter), which is exactly what you want! As it cools at room temperature, it will deflate slightly, which is totally normal and expected. After a few hours chilling in the fridge (or ideally overnight), you're left with a dense, creamy, protein-rich cheesecake that slices beautifully and tastes incredible. Each slice has about 15-20 grams of protein depending on how you cut it, making this a dessert you can actually feel good about eating! Top with fresh berries like strawberries, blueberries, or raspberries for a pop of color and tartness that balances the sweet white chocolate. This is perfect for meal prep, healthier desserts, post-workout treats, or anytime you want cheesecake without all the guilt!
Frequently Asked Questions
Q: Can I taste the cottage cheese?
A: Not at all! When you blend the cottage cheese until completely smooth (the most important step!), it transforms into a creamy, silky base that tastes just like traditional cheesecake. The white chocolate adds sweetness and richness, and you'd never know there's cottage cheese in there unless someone told you!
Q: Can I use a different size pan?
A: This recipe is specifically formulated for a 6-inch cake pan, which creates a taller, more dramatic cheesecake. If you use a larger pan (like 8 or 9 inches), the cheesecake will be thinner and will need less baking time, around 35-40 minutes. Check for that slightly jiggly center and adjust timing accordingly.
Q: Why do I need a water bath?
A: The water bath (bain-marie) provides gentle, even heat that prevents the cheesecake from cracking, overcooking, or getting a rubbery texture. The steam from the water keeps the oven environment moist, which helps the cheesecake bake evenly and stay creamy. Don't skip this step! It's what makes the texture perfect.
Q: Can I make this ahead of time?
A: Yes! This cheesecake actually tastes better the next day after the flavors have had time to meld and the texture has fully set. Make it 1-2 days ahead, keep it covered in the fridge, and add the fresh berries right before serving. It will keep in the fridge for up to 5 days.
This 3-ingredient high-protein cottage cheese cheesecake is pure magic! Just white chocolate chips, cottage cheese, and eggs create the creamiest, most decadent cheesecake. The secret is blending until completely smooth. Baked in a water bath, topped with fresh berries, and packed with protein!
Rate This Recipe!
Preparations
Prep Time:
15 minutes
Cook Time:
50-60 minutes
Total Time:
1 hour 15 minutes (plus cooling and chilling)
Cuisine:
American
Course:
Dessert
Calories:
280 kcal (approx. per slice, based on 8 slices)
Servings:
6-8 slices
Author:
Ronica Rupan
Ingredients
Ingredients
- 1¼ cups white chocolate chips
- 1⅔ cups Knudsen 4% cottage cheese, room temperature
- 5 large eggs, room temperature
For Serving:
- Fresh berries (strawberries, blueberries, raspberries)
- Optional: fresh mint leaves for garnish
Instructions
- Preheat and Prep the Pan Preheat your oven to 350°F (175°C). Generously grease a 6-inch round cake pan with cooking spray or butter, making sure to get the bottom and sides really well. Line the bottom with a circle of parchment paper, then grease the parchment too. Thoroughly grease the sides again. This double greasing ensures easy release!
- Melt the White Chocolate Place the white chocolate chips in a microwave-safe bowl. Microwave in 30-second intervals, stirring thoroughly between each interval, until the chocolate is completely melted and smooth. This usually takes 1½-2 minutes total. Let the melted chocolate cool for about 5 minutes so it doesn't scramble the eggs when you add it to the blender.
- Blend the Base - THE MOST IMPORTANT STEP Add the room temperature cottage cheese and eggs to a high-powered blender. Blend on high speed until the mixture is COMPLETELY smooth and silky with absolutely no lumps or graininess visible. This usually takes 1-2 minutes of blending. When you think it's done and looks smooth, blend for another 30 seconds! This extra blending is the secret to zero graininess and that perfect creamy cheesecake texture. The mixture should look like smooth cream with no cottage cheese curds visible at all.
- Add the Chocolate Pour the cooled melted white chocolate into the blender with the cottage cheese mixture. Blend again on high speed until the chocolate is fully incorporated and the batter is uniform in color with no white streaks. The batter should be smooth, pale, and creamy, about 30-45 seconds of blending.
- Prepare the Water Bath Pour the batter into your prepared 6-inch cake pan. Place the filled cake pan into a larger baking pan (a 9-inch square pan works perfectly). Carefully pour hot water (not boiling, just very hot tap water) into the outer larger pan until the water level reaches about halfway up the sides of the 6-inch cheesecake pan. Be careful not to splash any water into the cheesecake batter!
- Bake the Cheesecake Carefully transfer the water bath setup to the preheated oven. Bake for 50-60 minutes until the edges of the cheesecake are set and firm but the center still has a slight jiggle when you gently shake the pan. The jiggly area in the center should be about 1 inch in diameter. The cheesecake will continue cooking as it cools, so don't overbake! The top should look matte and set, not wet or shiny.
- Cool Completely Remove the cheesecake from the oven and carefully lift the 6-inch pan out of the water bath. Let the cheesecake cool completely at room temperature on a wire rack, about 1-2 hours. The cheesecake will deflate slightly as it cools, which is completely normal and expected! Don't worry, this is part of the process.
- Chill Once the cheesecake is at room temperature, cover the pan with plastic wrap or foil and refrigerate for at least 3-4 hours, but ideally overnight. The cheesecake needs this time to fully set and develop the best texture and flavor.
- Unmold and Serve When ready to serve, run a thin knife or offset spatula around the edges of the cheesecake to loosen it from the pan. Place a plate over the top of the pan and flip the whole thing upside down so the cheesecake releases onto the plate. Remove the pan and peel off the parchment paper. Carefully flip the cheesecake right side up onto your serving plate. Slice with a sharp knife, wiping the blade clean between each cut for neat slices. Top each slice with fresh berries and optional mint leaves. Serve chilled and enjoy!
More Recipes

Connect with Us on Social Media:

Hey! It’s Ronica!
This is where I love to share my passion for cooking, baking, and flavor. When I’m not creating delicious recipes, you’ll find me spending time with my family, working on my spice blends at Flora & Mana, or enjoying a homemade baked goods. Join me on this culinary journey to taste, healthy meals and fun kitchen hacks!
Read MoreWe'd Love to Hear from you!
Drop a Comment Below!
Leave a Reply
Get recipes first!
Subscribe now to get exclusive recipes, kitchen tips, and cooking inspiration delivered straight to your inbox.
Comments (3)
Lisa
I enjoy your recipes and could watch you bake and cook all day long. I love to watch people on their element creating their best dishes and treats! Please continue to entertain our pallets and makes us drool over these delicious dishes!😋
Lisa
Thank you for all these wonderful recipes I enjoy
each and every one of them. Please continue to entertain our pallets and make us drool over these delicious dishes!😋
Deana Williams
Looking forward to making the cheesecake 😋