Quick links
Lemon Curd Tart
INGREDIENTS
- Tart Shells:
- 1 and 2/3 cups Flour
- 1/2 cup Powdered Sugar
- Pinch of Salt
- 1/2 cup Cold Unsalted Butter
- 1 Room-Temp Egg
- Lemon Curd:
- 4 Egg Yolks
- 1/2 cup Granulated Sugar
- 1/2 cup Lemon Juice
- 5 tbsp Room-Temp Unsalted Butter
- Zest of 1 Lemon (Optional)
- Toppings:
- Fresh Blueberries
- Powdered Sugar
- Apricot glaze
INSTRUCTIONS
- Shells:
- In a food processor, blend flour, sugar, and salt. Add butter to create a crumbly mixture.
- Add whisked egg and blend until dough forms. Roll to 1/6 inch thickness, refrigerate for 1 hour.
- Cut dough into disks slightly larger than muffin pan holes, press into pan, refrigerate for 2 hours.
- Preheat oven to 325°F, prick pastries, freeze briefly.
- Bake for 20-25 mins or until golden brown
- set aside and let cool
- Curd:
- Mix sugar and lemon zest to a crumble texture, then add egg yolks and combine.
- Heat up lemon juice to a simmer and add gradually to the egg mixture, stirring well.
- Put the mixture back on the stove and cook until thick.
- Remove from heat, add butter, and whisk until melted. Strain if needed
- Assembly:
- Pour warm curd into the tartlet shells, tap to remove bubbles, refrigerate for 2-3 hours.
- Top with fresh blueberries and dust with powdered sugar. Finish with an apricot glaze.
18 mini tarts. Adjust tart size and lemon curd based on preference. Lemon curd can be made up to 3 days in advance.
Shakshuka with feta
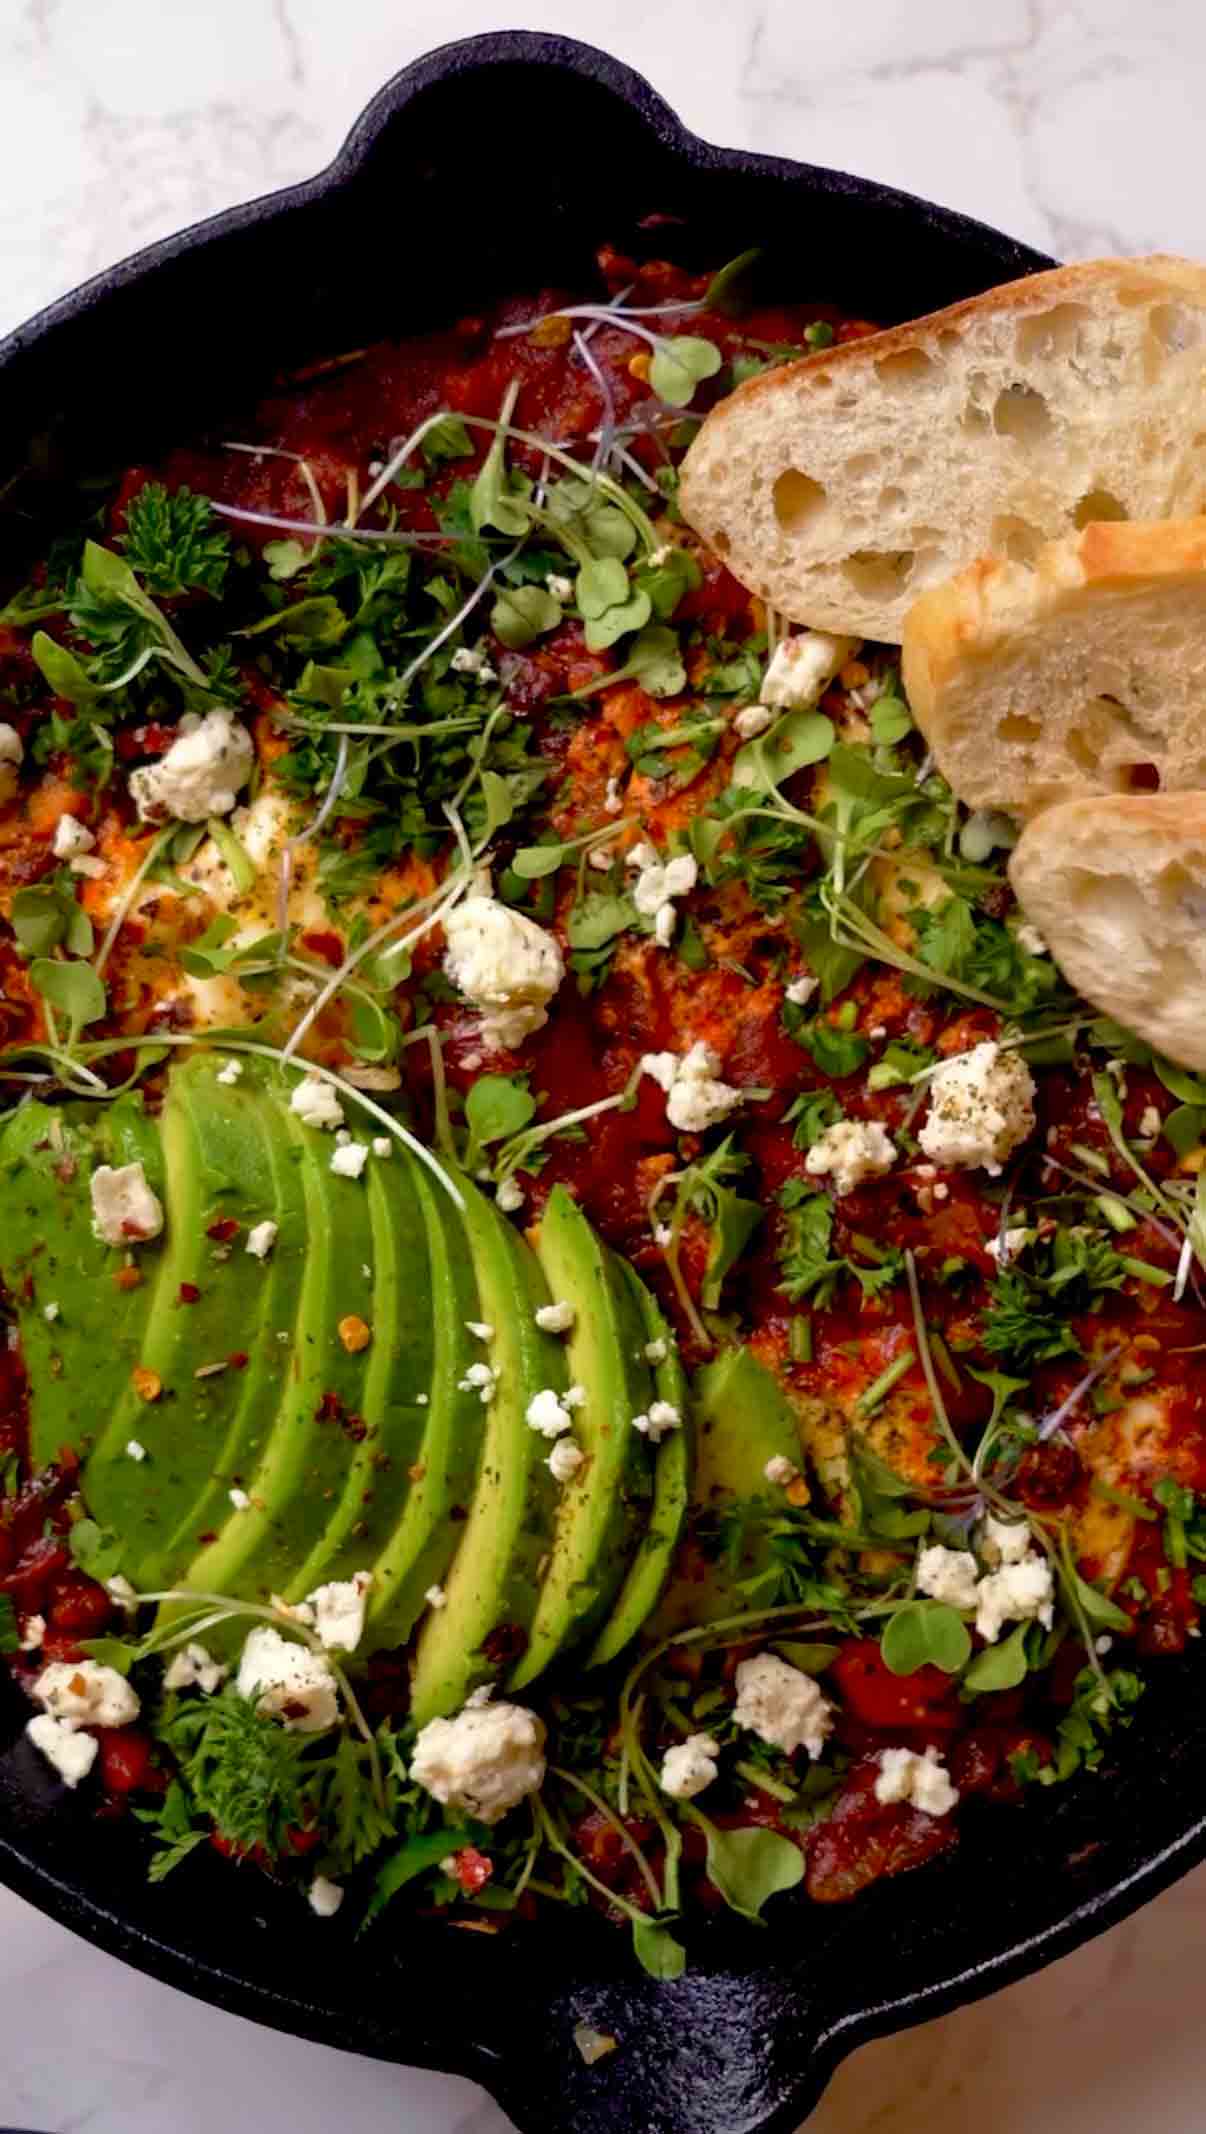
This Shakshuka with Feta is the ultimate cozy breakfast or brunch dish that's packed with bold, warming flavors! Shakshuka is a classic Middle Eastern and North African dish where eggs are poached directly in a thick, spiced tomato sauce, and it's one of those recipes that looks impressive but is surprisingly simple to make in just one skillet. The base starts with sautéed onions and red bell peppers that get soft and sweet, then you add loads of garlic, warm spices like smoked paprika, cumin, and chili powder that fill your kitchen with the most incredible aroma. Crushed tomatoes and fresh diced tomatoes cook down into this rich, thick sauce, and harissa paste brings a smoky, slightly spicy kick that gives the dish its signature depth and complexity. Once the sauce is perfectly thick and flavorful, you create little wells and crack eggs right into the sauce, cover the skillet, and let them poach until the whites are set but the yolks are still runny and perfect for dipping bread into. The finishing touches are what make this special, crumbled feta cheese adds salty, tangy creaminess, fresh parsley and cilantro bring brightness and color, diced avocado adds richness and makes it even more satisfying, and optional microgreens give it that restaurant-quality presentation. Serve this straight from the skillet family-style with lots of toasted crusty bread for scooping up all that delicious sauce and runny egg yolk. It's perfect for weekend brunch, a vegetarian dinner that even meat-eaters will love, or anytime you want something warm, comforting, and full of flavor. The best part? It's all made in one skillet, so cleanup is a breeze!
Frequently Asked Questions
Q: Can I make the tomato sauce ahead of time?
A: Absolutely! The tomato sauce base can be made 2-3 days ahead and stored in the fridge, which actually makes this even easier for weekend brunch. Make the sauce through step 4 (before adding the eggs), let it cool completely, then store it in an airtight container in the fridge. When you're ready to serve, reheat the sauce in your skillet over medium heat until simmering, then continue with making the wells and adding the eggs. The sauce can also be frozen for up to 3 months. Just thaw overnight in the fridge before reheating. This is a great meal prep option that lets you have fresh shakshuka in minutes!
Q: What if I don't like runny egg yolks? Can I cook them more?
A: Yes! The beauty of shakshuka is you can cook the eggs exactly how you like them. For runny yolks (traditional style), cook covered for 5-6 minutes. For slightly jammy yolks that are just starting to set, cook for 7-8 minutes. For fully cooked, hard yolks, cook for 9-10 minutes. The key is keeping the skillet covered so the steam helps cook the tops of the eggs. You can also check doneness by gently jiggling the pan, if the whites are set but the yolks still wobble, they're runny. If nothing jiggles, they're fully cooked. Just remember that eggs will continue cooking slightly from residual heat even after you remove the skillet from the stove!
Q: I can't find harissa paste. What can I substitute?
A: Harissa paste gives shakshuka that authentic smoky, spicy North African flavor, but if you can't find it, there are good substitutes! Mix together 1 tablespoon tomato paste, 1 teaspoon smoked paprika, ½ teaspoon cayenne pepper (adjust to your heat preference), ½ teaspoon cumin, and 1 teaspoon olive oil. You can also use sriracha or sambal oelek for heat (though the flavor profile is different), add an extra teaspoon of smoked paprika plus red pepper flakes, or make your own harissa by blending roasted red peppers with garlic, olive oil, and spices. Store-bought harissa is usually in the international aisle or with Middle Eastern ingredients. You can also order it online, it keeps for months in the fridge and is worth having on hand!
Q: Can I add other vegetables or proteins to shakshuka?
A: Yes, shakshuka is very versatile! For vegetables, try adding diced zucchini, chopped spinach or kale (add in the last 5 minutes of cooking the sauce), sliced mushrooms (sauté with the onions), diced eggplant, or chickpeas for extra protein and fiber. For protein, you can add cooked chorizo, crumbled spicy sausage, or ground lamb browned with the onions (this makes it non-vegetarian), or keep it vegetarian by adding white beans or lentils. Some people also add a handful of baby spinach right before adding the eggs. Just make sure any additions are cooked through and the sauce is still thick enough to hold the eggs. Don't overload it with too many additions or the eggs won't cook properly!
This Shakshuka with Feta is the ultimate one-skillet breakfast or brunch! Eggs are poached in a thick, spiced tomato sauce with bell peppers, onions, garlic, smoked paprika, cumin, and harissa paste for smoky heat. Top with crumbled feta, fresh herbs, and avocado, then serve with crusty bread for dipping. It's warm, comforting, and packed with bold Middle Eastern flavors. Perfect for weekend brunch or an easy vegetarian dinner!
Rate This Recipe!
Preparations
Prep Time:
10 minutes
Cook Time:
30 minutes
Total Time:
40 minutes
Cuisine:
Middle Eastern, North African
Course:
Breakfast, Brunch, Main Course, Dinner
Calories:
320 kcal (approx. per serving)
Servings:
3-5 (depending on number of eggs)
Author:
Ronica Rupan
Ingredients
Ingredients
For the Tomato Sauce:
- 2-3 tablespoons extra-virgin olive oil
- 1 cup yellow onion, chopped (about 1 medium onion)
- 1 red bell pepper, seeded and diced
- ¼ teaspoon sea salt, plus more to taste
- Freshly ground black pepper
- 4 medium garlic cloves, minced
- 1½ teaspoons smoked paprika
- 1 teaspoon chili powder
- ½ teaspoon ground cumin
- 1 (28-ounce) can crushed tomatoes
- 1 medium tomato, diced
- 1-2 tablespoons harissa paste (adjust to heat preference)
For the Eggs and Toppings:
- 3 to 5 large eggs
- ⅓ cup crumbled feta cheese
- ¼ cup fresh parsley leaves, chopped
- ¼ cup fresh cilantro leaves, chopped
- 1 ripe avocado, diced
- Microgreens for garnish (optional)
- Toasted crusty bread, for serving (pita, sourdough, or baguette)
Instructions
1. Heat the Oil
Heat 2-3 tablespoons of extra-virgin olive oil in a 12-inch lidded stainless steel or cast-iron skillet over medium heat. Make sure your skillet has a lid, you'll need it later for cooking the eggs. Swirl the oil to coat the bottom of the pan evenly.
2. Sauté the Vegetables
Add the chopped yellow onion, diced red bell pepper, ¼ teaspoon sea salt, and a few grinds of black pepper to the skillet. Sauté, stirring occasionally, until the onion becomes soft and translucent and the bell pepper is tender, about 6-8 minutes. You want the vegetables to soften and start to caramelize slightly, bringing out their natural sweetness.
3. Add the Aromatics and Spices
Reduce the heat to medium-low. Add the minced garlic, smoked paprika, chili powder, and ground cumin to the skillet. Stir everything together constantly for about 30 seconds, just until the garlic becomes fragrant and the spices are toasted. Be careful not to let the garlic burn, it can go from perfect to bitter very quickly on high heat.
4. Build the Tomato Sauce
Pour in the can of crushed tomatoes, add the diced fresh tomato, and stir in the harissa paste (start with 1 tablespoon if you're sensitive to heat, or use 2 tablespoons for more kick). Stir everything together until well combined. Increase the heat slightly and bring the mixture to a simmer. Then reduce the heat to medium-low and let the sauce simmer uncovered for about 15 minutes, stirring occasionally, until it thickens and reduces. The sauce should be thick enough that a spoon dragged through it leaves a trail. Taste and adjust seasoning with more salt and pepper if needed.
5. Create Wells for the Eggs
Once your sauce is thick and flavorful, use the back of a large spoon to create 3 to 5 evenly spaced indentations or "wells" in the sauce. Make sure the wells go almost down to the bottom of the pan but don't completely expose the pan surface. These wells are where you'll crack your eggs.
6. Add the Eggs
Crack one egg into a small bowl first (this prevents shells from getting into your dish), then gently pour it into one of the wells you created. Repeat with the remaining eggs, placing one egg in each well. Try to keep the eggs from touching each other if possible. Season the tops of the eggs lightly with a pinch of salt and pepper.
7. Cover and Cook
Cover the skillet with a tight-fitting lid. Let the eggs cook undisturbed for 5-8 minutes, depending on how you like your eggs. For runny yolks (traditional), cook for 5-6 minutes. For jammy yolks, cook for 7-8 minutes. For fully cooked yolks, cook for 9-10 minutes. The egg whites should be completely set and opaque, while the yolks should be cooked to your preference. Don't lift the lid too often or you'll release the steam that's cooking the eggs.
8. Add the Toppings
Once the eggs are cooked to your liking, remove the skillet from the heat. Immediately sprinkle the crumbled feta cheese over the top of the entire dish. Add the chopped fresh parsley and cilantro, scatter the diced avocado around, and finish with microgreens if using. The residual heat will warm the toppings slightly.
9. Serve Immediately
Bring the skillet directly to the table (use a trivet or hot pad!) and serve family-style. Provide toasted crusty bread on the side for everyone to scoop up the eggs, sauce, and toppings. Each person can take a portion with some sauce and an egg. Enjoy while it's hot!
Ginger Lemon Wellness Shot
INGREDIENTS
- ¼ cup of ginger root, washed and roughly chopped
- Juice from 2-3 lemons
- 1/2 cup of coconut water
- 2 tsp of honey
- A pinch or two of cayenne pepper
INSTRUCTIONS
- Begin by thoroughly washing and chopping your ginger root. There’s no need to peel it, the blender will do the hard work.
- Squeeze the juice from 2-3 lemons until you have about 1/2 cup.
- Place the chopped ginger, fresh lemon juice, coconut water, honey, and a dash of cayenne into your high-powered blender.
- Process until the mixture is silky smooth, usually around 1-2 minutes.
- Strain through a fine-mesh strainer, applying pressure to the solids to squeeze all of it out.
- Fill them in small airtight jars, you should get about 3-4 shots from this recipe.
- Enjoy the health-boosting benefits of ginger, lemon, and a touch of cayenne!
TIPS
- Slightly roll the lemon before juicing to get the maximum amount of juice.
- The shot is best consumed immediately for optimal health benefits. However, if you have leftovers, store them in an airtight container in the refrigerator and consume within 5-7 days.
- Feel free to adjust the amount of honey based on your personal taste preference.
Pineapple Bowl
To prepare the pineapple bowls, you will need:
- One ripe pineapple
- A sharp paring knife
- A spoon for scooping out the fruit
- Your choice of filling for the pineapple bowls
INSTRUCTIONS
- Begin by selecting a ripe pineapple. Look for one with a sweet aroma and firm skin.
- Wash the pineapple thoroughly to remove any dirt or residue from the skin.
- Place the pineapple on a cutting board, and using a sharp paring knife, carefully cut it in half lengthwise. Take your time to ensure an even cut.
- After cutting the pineapple in half, you have the option to keep the crown (pineapple stem) attached or slice it off.
- Using the paring knife, cut along the perimeter of each pineapple half. Angle the knife slightly towards the center while doing so, creating a V-shaped trough.
- Once the perimeter is cut, slice the center of the pineapple to create several smaller sections.
- With the sections in place, use a spoon to scoop out the fruit from both pineapple halves. Gently remove the pineapple chunks and transfer them to a bowl. Be careful not to damage the pineapple boat’s edges while scooping.
- Now, your pineapple boats are ready to be filled with your choice of dish. You can get creative with various fruit salads, grilled vegetables, or even savory rice preparations.
- Alternatively, if you plan to use the pineapple bowls later, cover the bowl containing the pineapple chunks and store it in the refrigerator for up to two days. This will keep the fruit fresh until you’re ready to use it.
Enjoy your delicious and beautiful pineapple bowls with your desired filling!
Chicken Tortilla Soup
INGREDIENTS
- 3 Tbsp olive oil
- 1 large onion chopped
- 7 garlic cloves, minced
- 1 green bell pepper diced
- 1 jalapeño pepper diced, ( remove seeds for less heat )
- 1 ½ Tbsp of tomato paste
- 1 tsp ground cumin
- 1 tsp chili powder
- ½ tsp smoked paprika
- ½ dried oregano powder
- 1 tsp garlic granules
- 1 lb skinless chicken breasts (2 pieces)
- 20 oz petite diced tomato
- 32 oz chicken broth
- 16 oz water (if needed)
- 14 oz black beans drained and rinsed
- 1 cup of corn,
- 1/2 cup cilantro, chopped
- 1 lime, juiced
- 1 tsp salt or to taste
- ( For more heat add ¼ tsp of cayenne pepper)
GARNISH
- Lime
- Cilantro
- Mexican crema
- Cotija cheese
- Corn tortilla strips – Fried
- Avocado
To make the tortilla strips, cut into thin strips and fry in hot oil for a few minutes until lightly brown. Allow to drain on a paper towel and sprinkle with salt. Set aside until your soup is ready.
In a large pot, heat up olive oil and add garlic, onions, jalapeño and green bell pepper. Sauté until they are tender, about 3 minutes. Add spices, salt and tomato paste and cook for 2 minutes. Add tomatoes, and chicken broth. Bring to a boil and add chicken breast. You may slice the chicken breast in half, lengthwise so it may cook faster. Bring temperature to medium and cover. Cook for 20 minutes. Once chicken is cooked, remove, and shred with 2 forks. Add chicken back in the pot with black beans. Check if water has cooked down and add more if needed. Cook for another 5 minutes. Add corn, cilantro and lime juice and cook for 3 minutes and remove pot off the heat. Taste for salt and seasoning.
Garnish each bowl for toppings and enjoy!
Honey Creole Salmon
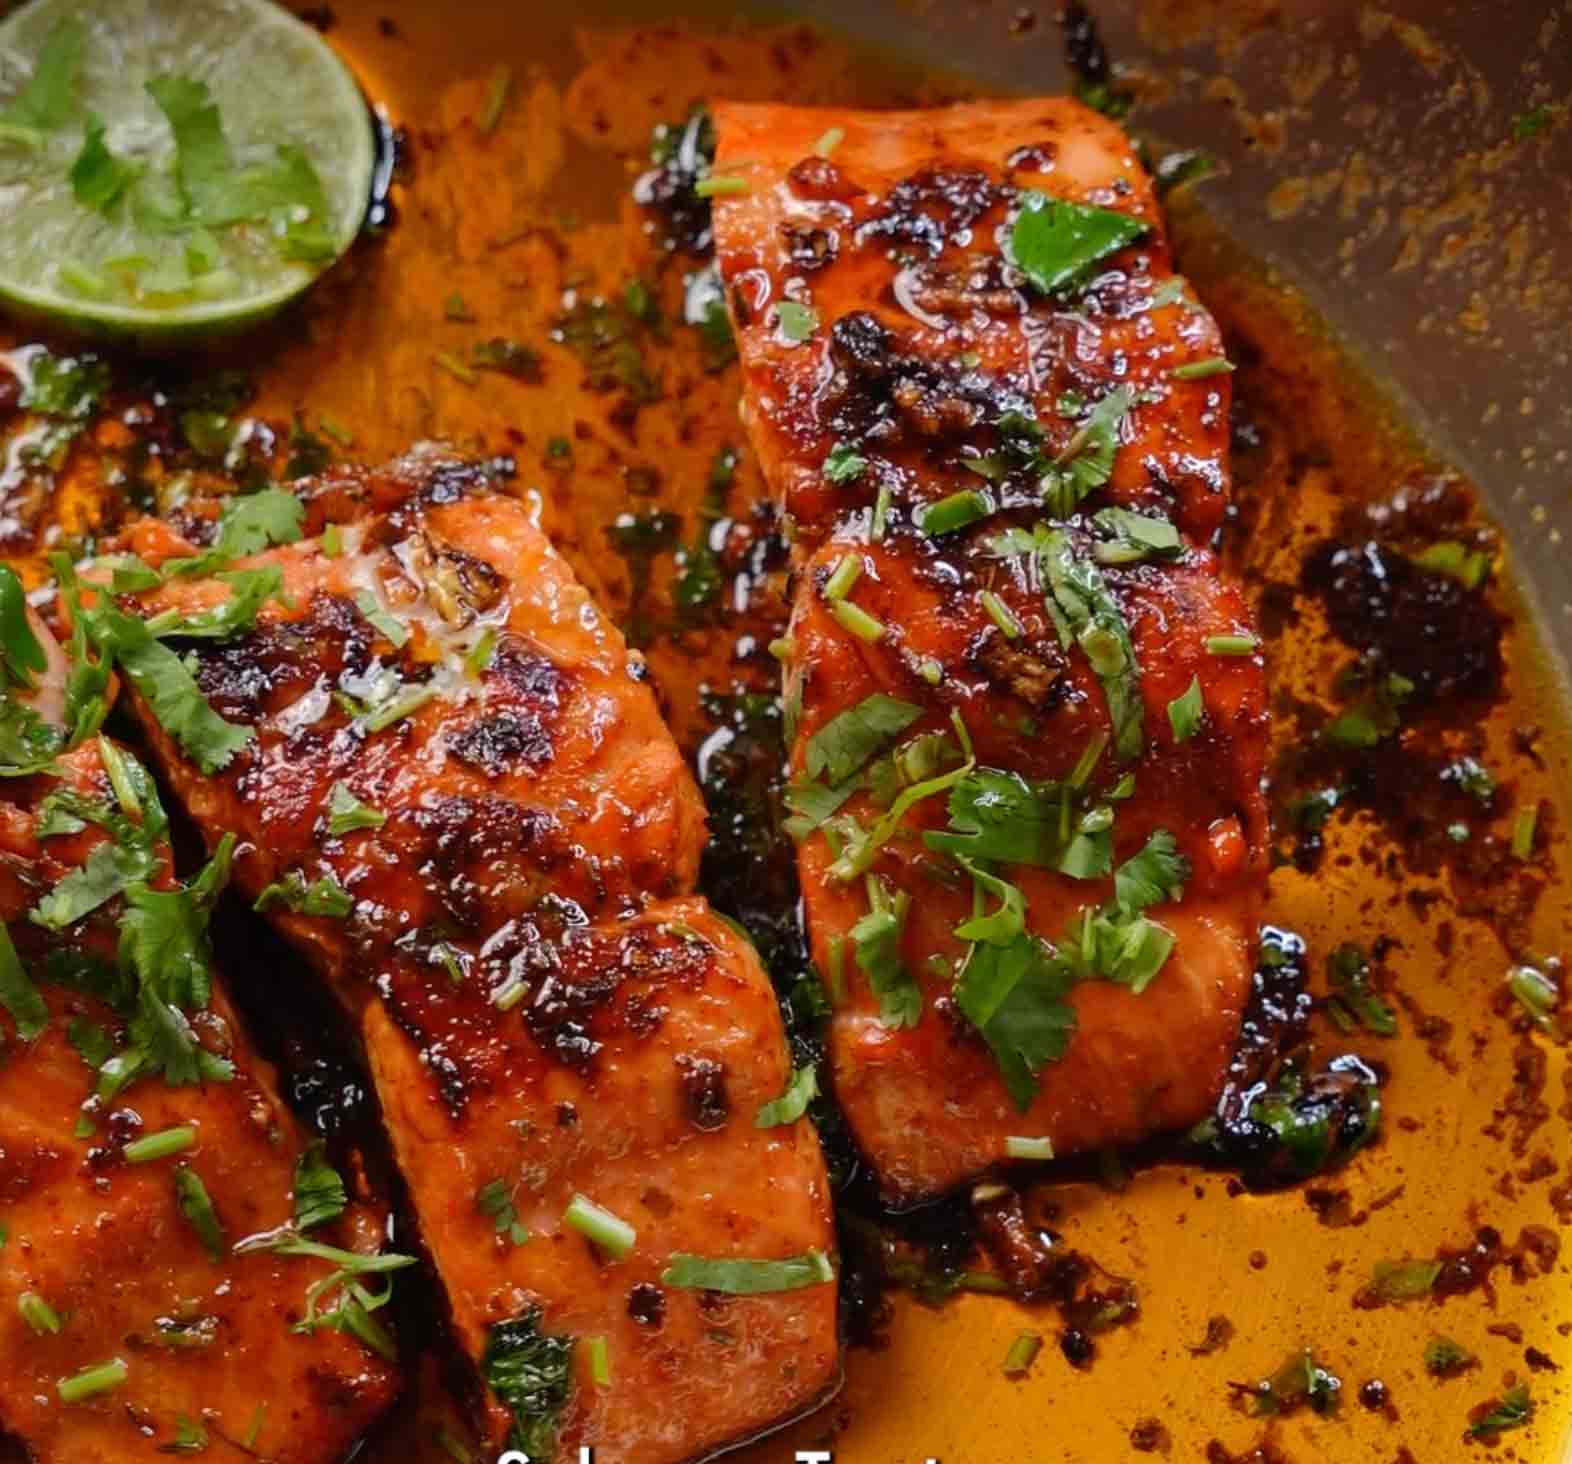
This Honey Creole Salmon is flaky, flavorful, and the kind of dinner that makes you feel like a chef but takes just 15 minutes to make! Rich, buttery sockeye salmon gets pan-seared to perfection in a glossy sauce made with butter, honey, garlic, Creole seasoning, and fresh lime juice that creates this incredible balance of sweet, spicy, savory, and tangy all at once. The honey caramelizes as it cooks, creating a beautiful glaze that coats every bite of salmon, while the Creole seasoning brings warmth, depth, and just the right amount of kick. Fresh lime juice adds brightness and cuts through the richness of the butter and honey, and chopped cilantro brings that fresh, herbaceous note that ties everything together. The best part is how the sauce develops in the pan, you start by melting butter and honey together, then add minced garlic and Creole spices that become fragrant and toasted, creating this aromatic base that the salmon cooks in. As the salmon sears, you spoon that honey-butter-garlic mixture over the fillets repeatedly, basting them so they stay moist and absorb all those incredible flavors. The result is salmon that's perfectly cooked, flaky and slightly pink in the middle, with a gorgeous caramelized exterior and a sauce so good you'll want to drizzle it over everything. Garnish with fresh lime wedges for squeezing, sliced jalapeños for heat and color, and more cilantro for freshness. Serve this over rice, with roasted vegetables, or alongside a simple salad for a complete meal that tastes like it came from your favorite restaurant but was made in your own kitchen in less time than it takes to get takeout!
Frequently Asked Questions
Q: Can I use frozen salmon for this recipe?
A: Yes, but make sure to thaw it completely first! The best way to thaw salmon is to place it in the refrigerator overnight. If you need to thaw it quickly, put the sealed salmon in a bowl of cold water for 30-60 minutes, changing the water every 15 minutes. Never thaw salmon at room temperature or in hot water. Once thawed, pat it very dry with paper towels before cooking, frozen salmon tends to have more moisture. The cooking time should be the same as fresh salmon. Just note that previously frozen salmon may not have quite the same texture as fresh, but it will still be delicious with this flavorful sauce!
Q: My sauce is too thin and runny. How do I thicken it?
A: If your sauce is too thin, there are a few tricks to thicken it up! First, once you remove the salmon from the pan, keep the pan on medium-high heat and let the sauce simmer for 1-2 minutes to reduce and thicken naturally. The honey will caramelize more and the liquid will evaporate, creating a thicker, more syrupy glaze. If it's still too thin, you can whisk in an extra ½ tablespoon of cold butter, which will help emulsify and thicken the sauce. Another option is to remove the salmon, add ½ teaspoon of cornstarch mixed with 1 tablespoon of water to the pan, and whisk it in while the sauce simmers. This will thicken it quickly without changing the flavor. Just remember, the sauce will thicken slightly as it cools, so don't make it too thick in the pan!.
Q: Can I bake or grill this salmon instead of pan-searing it?
A: Absolutely! While pan-searing gives you the best caramelization and allows you to baste continuously, you can adapt this recipe for baking or grilling. To bake: Preheat your oven to 400°F. Make the honey-butter-garlic sauce in a small saucepan, then pour half of it into a baking dish. Place the salmon on top, pour the remaining sauce over the fillets, and bake for 12-15 minutes until the salmon flakes easily. Baste once or twice during baking. To grill: Make the sauce in a small pot, brush the salmon with some of the sauce, and grill over medium-high heat for 4-5 minutes per side, basting with more sauce as it cooks. Just be careful as the honey can cause flare-ups on the grill!
Q: What other proteins can I use this sauce with?
A: This honey Creole sauce is incredibly versatile and works beautifully with so many proteins! Try it with other fish like mahi-mahi, halibut, cod, or sea bass, just adjust cooking times based on thickness. It's amazing with shrimp, cook them for 2-3 minutes per side until pink and opaque. Chicken breasts or thighs work great too, just pound them to even thickness and cook for 6-7 minutes per side until cooked through. You could even use it on pork chops (cook to 145°F internal temperature) or firm tofu for a vegetarian option (press the tofu well and cook until golden on both sides). The sweet-spicy-tangy flavor profile complements just about any protein, so feel free to experiment!
This Honey Creole Salmon is flaky, flavorful, and comes together in just 15 minutes! Sockeye salmon gets pan-seared in a buttery honey garlic sauce with Creole seasoning, fresh lime juice, and cilantro for the perfect balance of sweet, spicy, and tangy. The honey caramelizes beautifully while the Creole spices add warmth and depth. Garnish with fresh jalapeños and lime for a restaurant-quality dish that's quick enough for weeknights but impressive enough for company!
Rate This Recipe!
Preparations
Prep Time:
5 minutes
Cook Time:
10 minutes
Total Time:
15 minutes
Cuisine:
Creole, American
Course:
Main Course, Dinner
Calories:
380 kcal (approx. per serving)
Servings:
4
Author:
Ronica Rupan
Ingredients
Ingredients
For the Salmon:
- 1 pound sockeye salmon fillet (about 4 portions, or 4 individual fillets)
- Lemon or lime, for washing
- Kosher salt, for seasoning
- 3-4 tablespoons unsalted butter
- 2 tablespoons honey
- 4 cloves garlic, minced
- 1½ tablespoons Creole Kick Carnival seasoning ( Floraandmana.com)
- ¼ cup (4 tablespoons) fresh lime juice (about 2 limes)
- 2 tablespoons fresh cilantro, chopped
For Garnish:
- Fresh lime wedges
- Fresh jalapeño slices
- Additional chopped cilantro
Instructions
1. Prep the Salmon
Rinse the salmon fillet under cold water with a squeeze of lemon or lime juice. This helps remove any fishy smell. Pat the salmon completely dry with paper towels, this is important for getting a good sear! If you have one large fillet, you can cut it into 4 portions, or use 4 individual fillets. Season both sides lightly with a pinch of kosher salt.
2. Make the Honey Butter Base
In a large skillet (cast iron or non-stick works great) over medium heat, melt the butter. Once the butter is melted and bubbling, stir in the honey until it's completely combined with the butter. The mixture should be smooth and glossy.
3. Add Aromatics and Spices
Add the minced garlic and Creole Kick Carnival seasoning to the honey-butter mixture. Sauté for about 1 minute, stirring constantly, until the garlic becomes fragrant and the spices are toasted and aromatic. Be careful not to burn the garlic, if your pan is too hot, reduce the heat slightly.
4. Add the Salmon
Place the salmon fillets skin-side up (if they have skin) into the pan, nestling them into the honey-butter-garlic mixture. Use a spoon to immediately coat the tops of the fillets with the sauce.
5. Add Lime Juice
Squeeze the fresh lime juice (about ¼ cup) over the salmon fillets. The lime juice will sizzle and create even more flavor in the sauce.
6. Cook the Salmon
Cook the salmon for approximately 4 minutes on the first side without moving it, letting it develop a nice caramelized crust. While it cooks, use a spoon to continuously baste the tops of the fillets with the honey-butter-garlic sauce from the pan. This keeps the salmon moist and builds flavor.
7. Flip and Finish
Carefully flip the salmon fillets to the other side. Cook for another 3-4 minutes, continuing to spoon the sauce over the fillets as they cook. The exact cooking time depends on the thickness of your salmon, a 1-inch thick fillet will take about 8 minutes total (4 minutes per side), while thinner fillets will cook faster. The salmon is done when it flakes easily with a fork and is slightly pink in the center. Don't overcook it or it will be dry!
8. Optional Add-Ins
If you want the jalapeños and extra cilantro to be cooked slightly, add them to the pan during the last 2 minutes of cooking. Otherwise, use them fresh as garnish.
9. Garnish and Serve
Remove the salmon from heat. Transfer the fillets to serving plates and spoon the remaining honey-butter-garlic sauce from the pan over the top. Garnish with fresh lime wedges for squeezing, sliced jalapeños for heat, and chopped fresh cilantro. Serve immediately while hot and enjoy!
Zucchini and Yellow Squash Pastry
INGREDIENTS
- Puff pastry, homemade or store-bought, cut into rectangles
- 1 tbsp of olive oil
- 1 small zucchini, sliced in circles
- 1 yellow squash, sliced in circles
- 1 tbsp of balsamic glaze syrup
- 1 tbsp hot honey
- A handful of fresh basil
- 1 thinly sliced garlic clove
- Garlic of Eden seasoning
- Kosher salt to taste
- Freshly grated mozzarella cheese
- Egg wash
INSTRUCTIONS
- Preheat the oven to 400°F (204°C).
- Cut zucchini and yellow squash into thin circular slices.
- Line a baking sheet with parchment paper.
- Drizzle olive oil, balsamic glaze, and hot honey onto the parchment paper. Add the thinly sliced garlic cloves.
- Arrange the zucchini and yellow squash slices on top of the oil and glaze mixture. Press them gently so they adhere.
- Season the vegetable slices with Garlic of Eden seasoning and a sprinkle of kosher salt.
- Evenly sprinkle 2 tablespoons of the freshly grated mozzarella cheese over the vegetables.
- Cut the puff pastry into 6 rectangles. Place each puff pastry rectangle on top of the seasoned vegetables, pressing firmly around the zucchini and squash and on the top of the pastry.
- Apply a layer of egg wash over the puff pastry.
- Bake in the preheated oven for 15-20 minutes, or until the puff pastry is golden brown.
- Remove the baking sheet from the oven and let it cool for 10 minutes. Then, carefully flip each tart over.
- Garnish with fresh basil and a drizzle of balsamic glaze before serving. Enjoy your upside-down zucchini and yellow squash pastry.
Roasted Tomato Garlic Bruschetta
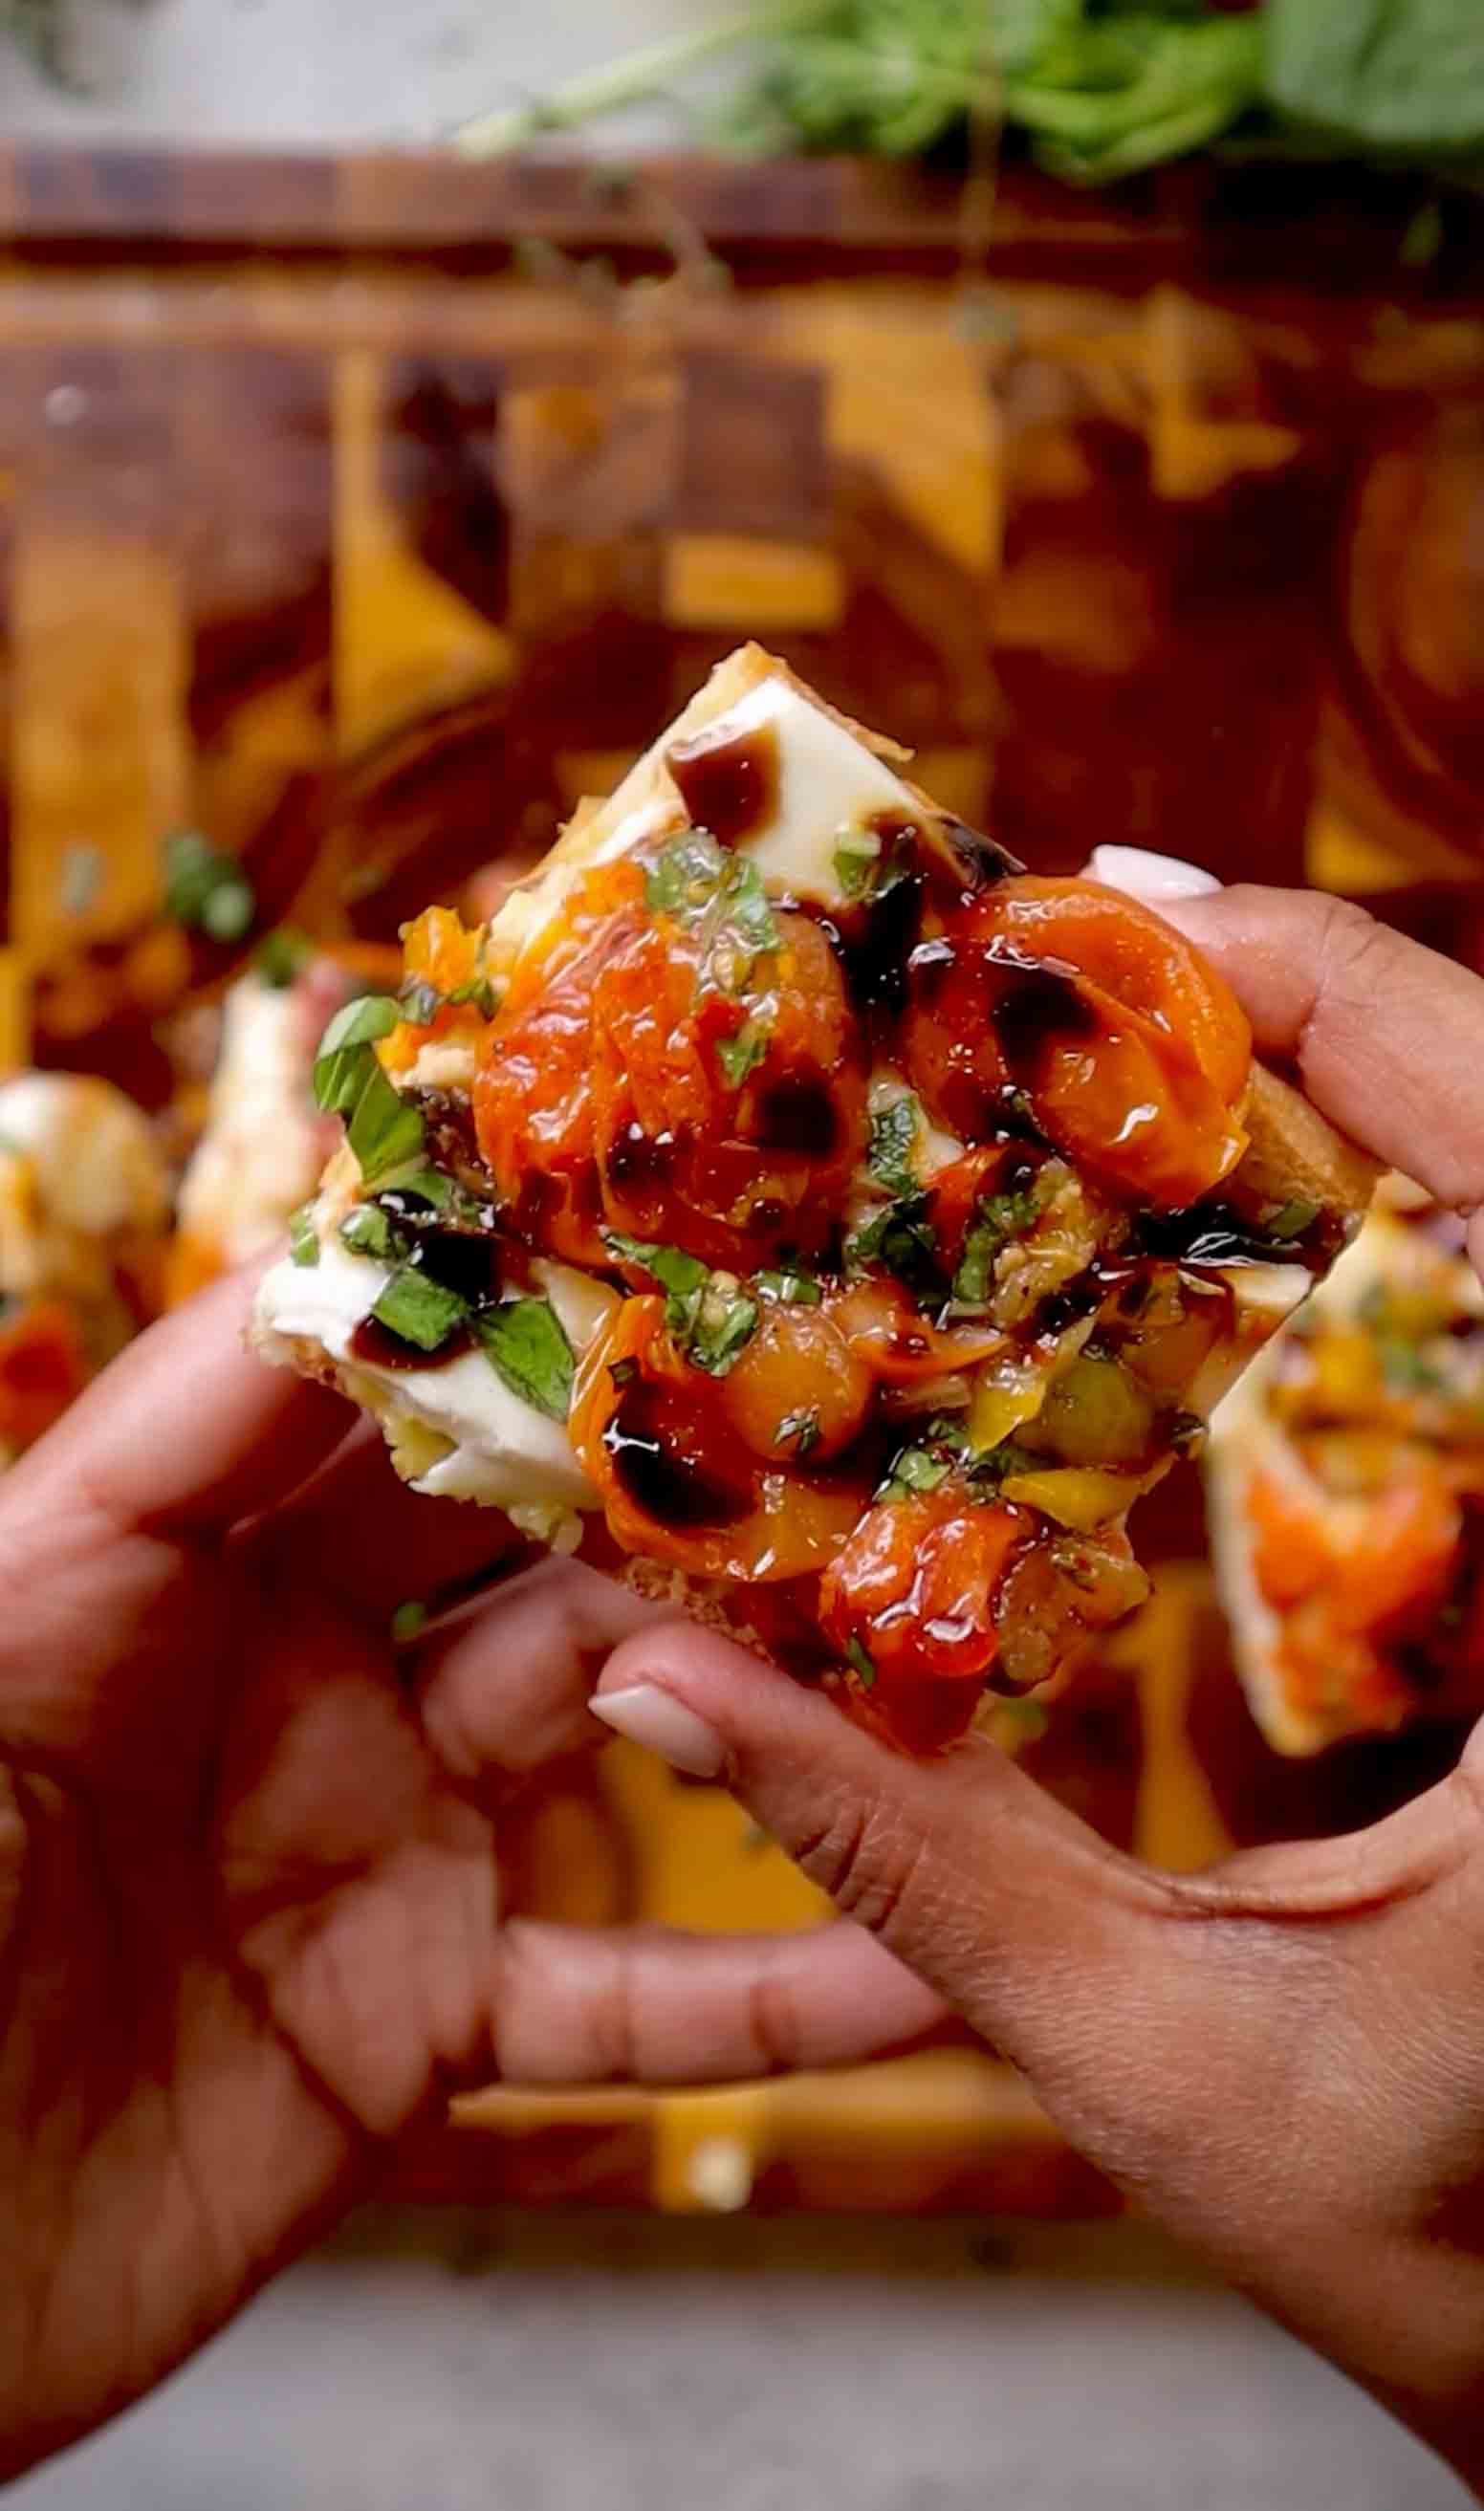
This Roasted Tomato & Fresh Bruschetta is the ultimate appetizer that combines the best of both worlds, sweet caramelized roasted tomatoes and bright fresh tomato bruschetta, all piled on crispy toasted bread with creamy mozzarella! This isn't your typical bruschetta, it's elevated with layers of flavor and texture that make every bite interesting. The base starts with cherry tomatoes that get roasted in the oven with whole garlic cloves, fresh thyme, and olive oil until they're bursting, caramelized, and intensely sweet. That roasting concentrates all the tomato flavor and creates this jammy, almost sauce-like texture that's incredible. While those are roasting, you make a fresh bruschetta mixture with diced heirloom tomatoes, fresh basil, grated garlic, olive oil, red wine vinegar, and a kick of red chili flakes that adds brightness and a little heat. The baguette slices get toasted until golden and crispy, creating the perfect sturdy base that won't get soggy. Then comes the fun assembly, you spread those roasted garlic cloves right on the toasted bread (they're so soft and sweet after roasting!), add a slice of fresh mozzarella for creaminess, pile on the warm roasted tomatoes, top with the cool fresh bruschetta mixture, and finish with a drizzle of balsamic glaze and fresh herbs. The combination of warm and cool, roasted and fresh, sweet and tangy, creamy and crunchy makes this bruschetta absolutely irresistible. It's perfect for parties, summer gatherings, date nights, or anytime you want an appetizer that looks impressive but is actually super simple to make. Your guests will be reaching for seconds and thirds!
Frequently Asked Questions
Q: Can I make this without roasting the tomatoes?
A: You could, but I really don't recommend it! The roasted tomatoes are what make this bruschetta special and different from regular bruschetta. Roasting concentrates the tomato flavor, caramelizes the natural sugars, and creates that jammy, sweet texture that contrasts beautifully with the fresh tomatoes. It only takes 15-20 minutes and transforms the tomatoes from good to incredible. If you're really short on time, you could skip the roasting and just make it with all fresh tomatoes, but you'll miss out on that depth of flavor and the warm-and-cool contrast that makes this recipe so delicious. The roasted garlic is also a key component that becomes sweet and spreadable.
Q: What's the best way to keep the bread from getting soggy?
A: Great question! The key is to assemble these right before serving, not hours in advance. Even with the best precautions, bread will eventually get soggy when topped with juicy tomatoes. Here are some tricks: (1) Toast the bread until it's very crispy and golden, not just lightly toasted. (2) Let the roasted tomatoes cool for 5 minutes so they're not piping hot and releasing tons of steam onto the bread. (3) Use the roasted garlic as a barrier, spreading it on the bread first helps create a protective layer. (4) Don't overload each piece with too much topping, use just enough to get all the flavors. (5) Assemble no more than 10-15 minutes before serving. If you need to prep ahead, keep all components separate and assemble when guests arrive.
Q: I can't find heirloom tomatoes. What should I use instead?
A: No problem at all! Heirloom tomatoes are beautiful and flavorful, but regular cherry tomatoes or grape tomatoes work perfectly for the fresh bruschetta mixture. You could also use Roma tomatoes (also called plum tomatoes), just make sure to remove the seeds and dice the flesh so it's not too watery. Campari tomatoes are another great option, they're small and very flavorful. Really, any ripe, flavorful tomato will work! The key is making sure your tomatoes are ripe and at room temperature for the best flavor. In the off-season when tomatoes aren't great, you might want to add a tiny pinch of sugar to the fresh mixture to enhance the sweetness.
Q: Can I serve this as a main course instead of an appetizer?
A: Absolutely! While this is traditionally an appetizer, you can easily turn it into a light main course. To make it more substantial, increase the amount of mozzarella and maybe add some prosciutto or salami on top for protein. Serve it alongside a big green salad dressed with olive oil and lemon, some roasted vegetables, or a bowl of soup like tomato soup or minestrone. You could also serve 3-4 pieces per person as a light lunch with a side of mixed greens. If you're making it a main course for dinner, consider adding some white beans or chickpeas to the fresh bruschetta mixture for extra protein and fiber, or serve it with a side of pasta. It's versatile enough to work as either an appetizer or a light meal!
This Roasted Tomato & Fresh Bruschetta is the ultimate appetizer with two kinds of tomatoes for double the flavor! Cherry tomatoes get roasted with garlic and thyme until caramelized and jammy, while fresh heirloom tomatoes get tossed with basil, garlic, and red wine vinegar. Pile both on crispy toasted baguette slices with fresh mozzarella, then drizzle with balsamic glaze for the perfect bite. It's fresh, flavorful, and absolutely addictive!
Rate This Recipe!
Preparations
Prep Time:
15 minutes
Cook Time:
20 minutes
Standing Time:
1 hour (for fresh bruschetta)
Total Time:
1 hour 35 minutes
Cuisine:
Italian
Course:
Appetizer
Calories:
180 kcal (approx. per serving)
Servings:
6-8 (about 16-20 pieces)
Author:
Ronica Rupan
Ingredients
Ingredients
For the Roasted Tomatoes:
- 1 pint cherry tomatoes (about 2 cups)
- 6 whole garlic cloves, peeled
- 4 tablespoons olive oil
- 3 sprigs fresh thyme
- ½ teaspoon kosher salt
- ¼ teaspoon black pepper
For the Toasted Bread:
- 1 French baguette
- 2-3 tablespoons olive oil, for brushing
For the Fresh Bruschetta Topping:
- 1 cup heirloom mini tomatoes (or cherry tomatoes), diced
- 1 garlic clove, grated or minced
- 2-3 fresh basil leaves, finely chopped (about 2 tablespoons)
- 2 tablespoons olive oil
- 1 teaspoon red wine vinegar
- ½ teaspoon red chili flakes
- Salt and pepper to taste
For Assembly:
- 8 ounces fresh mozzarella cheese, sliced
For Garnish:
- Balsamic glaze
- Fresh thyme leaves
- Fresh basil leaves, torn or whole
Instructions
1. Roast the Tomatoes
Preheat your oven to 400°F (200°C). In a medium bowl, toss together the cherry tomatoes, whole garlic cloves, 4 tablespoons olive oil, fresh thyme sprigs, salt, and pepper until everything is well coated. Transfer the mixture to a small Dutch oven or spread it on a rimmed baking sheet. Roast for 15-20 minutes, or until the tomatoes are soft, bursting, and starting to caramelize around the edges. The garlic should be golden and very soft. The tomatoes will release their juices and become jammy and sweet.
2. Toast the Bread
While the tomatoes roast, slice the baguette into ½-inch thick diagonal slices. You should get about 16-20 slices depending on the size of your baguette. Arrange the slices on a separate baking sheet in a single layer. Brush the tops generously with olive oil. Place in the oven and toast for 5-7 minutes, or until the bread is lightly golden brown and crispy. Keep an eye on them so they don't burn! Remove from the oven and set aside to cool slightly.
3. Make the Fresh Bruschetta Topping
While the tomatoes roast and the bread toasts, make your fresh bruschetta mixture. Dice the heirloom tomatoes into small pieces and place in a bowl. Add the grated garlic, finely chopped fresh basil, 2 tablespoons olive oil, red wine vinegar, red chili flakes, and season with salt and pepper to taste. Mix everything together well. Let this mixture stand at room temperature for at least 1 hour before serving. This resting time allows all the flavors to meld together and the tomatoes to release their juices, creating a flavorful mixture. You can make this several hours ahead if needed.
4. Remove from Oven
Once the roasted tomatoes and garlic are done, remove them from the oven. Discard the thyme sprigs. The garlic cloves should be so soft you can easily mash them with a fork. Set aside to cool slightly.
5. Assemble the Bruschetta
Now for the fun part! Take a toasted baguette slice and place 1-2 of the roasted garlic cloves on top. Use a fork to mash and spread the soft, sweet garlic across the bread, this creates a delicious garlicky base. Place a slice of fresh mozzarella on top of the garlic. Add 2-3 of the roasted cherry tomatoes on top of the mozzarella, gently pressing them down. Spoon a generous amount of the fresh bruschetta mixture on top of the roasted tomatoes. The combination of warm roasted tomatoes and cool fresh bruschetta is perfect!
6. Garnish and Serve
Arrange all the assembled bruschetta on a serving platter. Drizzle generously with balsamic glaze in a back-and-forth motion across all the pieces. Garnish with fresh thyme leaves and torn or whole fresh basil leaves for a beautiful presentation. Serve immediately while the bread is still crispy and the roasted tomatoes are warm. Watch them disappear!
Creole Corn Ribs
INGREDIENTS
Creole Kick Corn Ribs Ingredients:
- 4 ears of fresh corn, shucked
- 4 tablespoons of extra-virgin olive oil
- 1 lime, cut in half
- 1 tablespoon of Creole Kick seasoning
- 3 cloves of garlic, minced
Creole Mayo Sauce Ingredients:
- ¼ cup of mayonnaise
- ¼ cup of sour cream
- 1 tablespoon of freshly squeezed lime juice
- 2 cloves of garlic, minced
- 1 tablespoon of Creole Kick Carnival seasoning
Garlic butter:
- 2 tbsp melted butter
- 2 cloves of minced garlic
First off, let’s get that Creole Mayo Sauce sorted. In a small bowl, whisk together the mayonnaise, sour cream, lime juice, minced garlic, and Creole Kick Carnival seasoning until it’s smooth.. Cover it up and let it chill in the fridge until you’re ready. You can even make this sauce a day in advance.
Now, for the Corn Ribs. Turn on your oven to 400ºF (200ºC). Lay a dish towel under your cutting board to keep it steady – safety first, after all. Hold each corn cob securely on its end and use a sharp knife to split it into 4 equal “ribsâ€. It may take a little muscle, but just do it carefully.
Line your baking sheet with the ribs and prepare your seasoning mixture. Combine your olive oil, Creole Kick seasoning, and minced garlic, then brush this mixture generously over the corn ribs, making sure every kernel gets some love.
Place in the oven or on a grill and let those corn ribs until they’re tender and showing off some charred edges, which should take around 25 to 30 minutes.
When they’re done, arrange your corn ribs on a serving platter. Brushed him with garlic, butter. Give them a fresh squeeze of lime, and if you like , sprinkle some parmesan, jalapenos, and fresh cilantro on top. Serve up these beauties with your chilled Creole mayo sauce, and watch your ask you for more because they will be gone so fast! . Enjoy!
Get your Creole Kick Carnaval seasoning
Lavender Lemonade
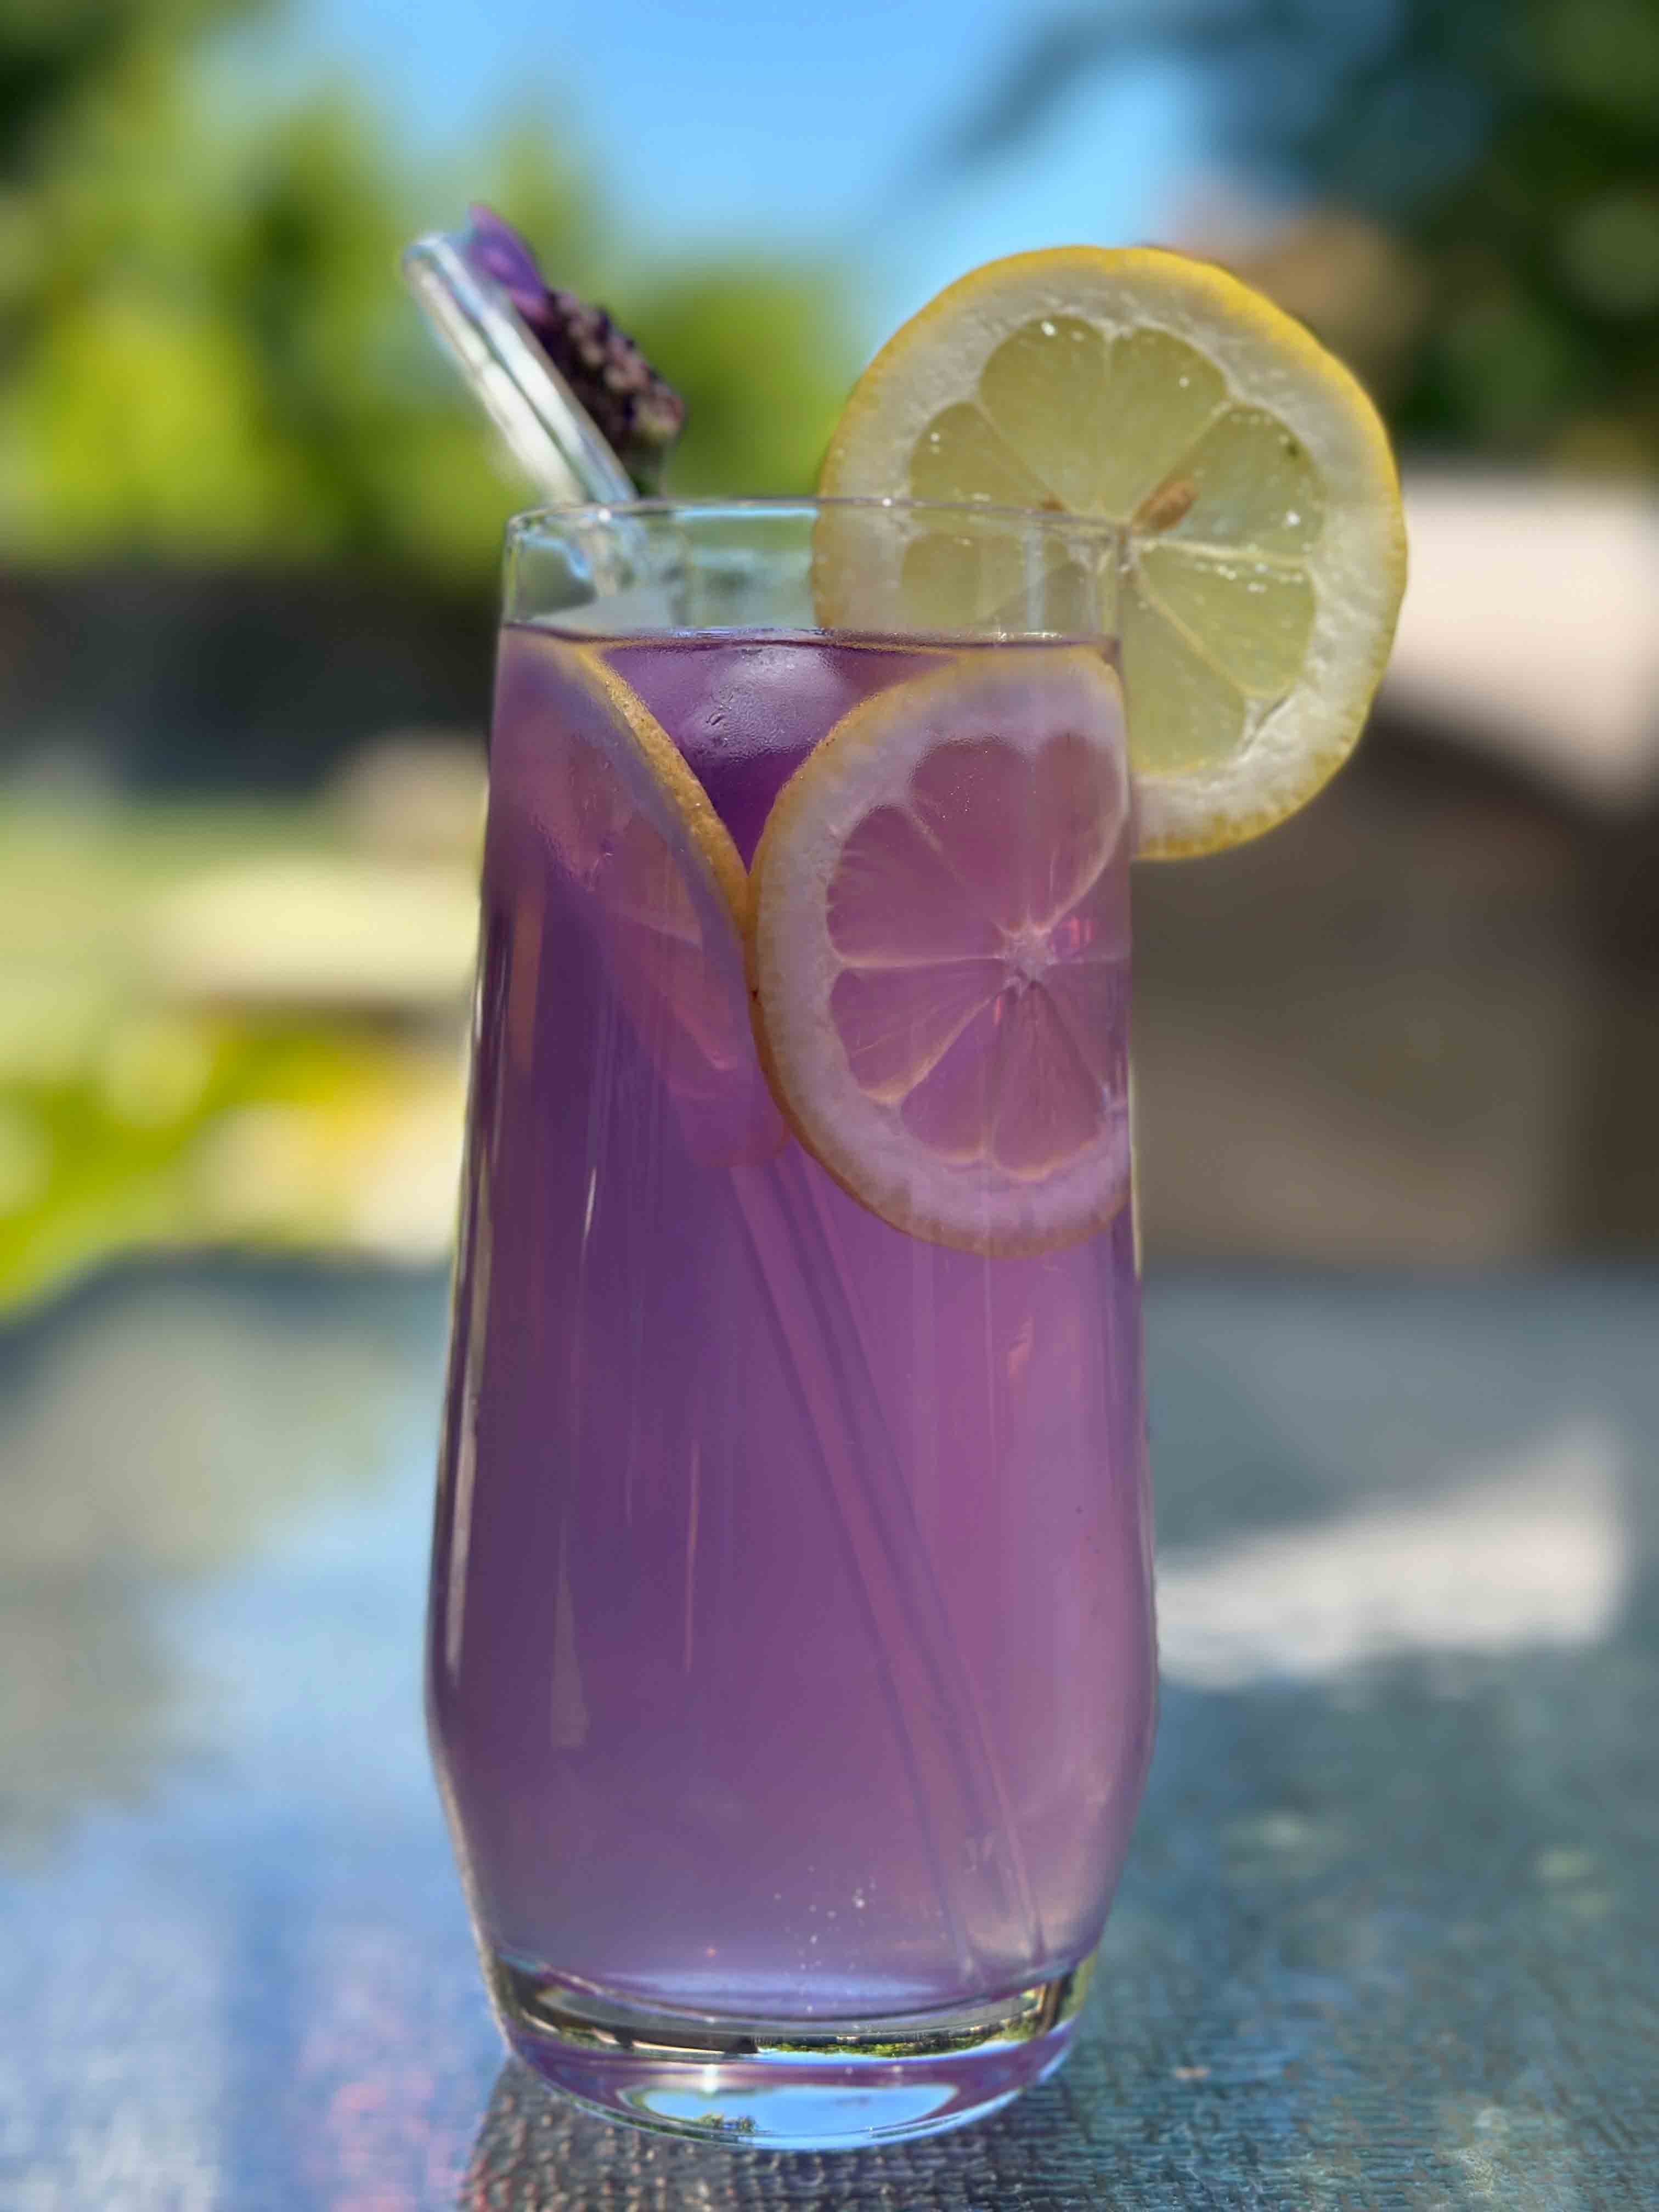
This lavender lemonade is the most refreshing, elegant drink you'll make all summer! It's the perfect balance of tart, sweet, and floral with fresh lemon juice, homemade lavender syrup, and an optional gorgeous blue color from pea flowers that makes it absolutely stunning to serve. You start by making your own lavender syrup, which is easier than you think. Just simmer sugar, water, and dried lavender flowers together until the sugar dissolves, let it cool, then strain out the flowers. This creates a beautifully fragrant syrup that adds that subtle floral note without being overpowering or soapy. The key is using the right amount of lavender, too little and you won't taste it, too much and it can taste like perfume. This recipe gets it just right. Fresh lemon juice is essential here, don't even think about using bottled! The bright, zingy tartness from freshly squeezed lemons is what makes this lemonade so refreshing and balanced against the sweet lavender. If you want to take it to the next level visually, you can steep dried pea flowers (also called butterfly pea flowers) in hot water to create this gorgeous deep blue tea. When you add it to the lemonade, it turns the most beautiful purple-blue color that's totally Instagram-worthy. The pea flowers don't add any flavor, they're purely for that stunning color transformation. You mix everything together in a pitcher with cold water, pour it over ice in tall glasses, and garnish with fresh lavender sprigs or lemon slices. Every sip is refreshing, floral, tart, and just sweet enough. It's perfect for summer parties, brunch gatherings, garden parties, or just when you want something more special than regular lemonade. The recipe makes enough for a crowd, but I've also included a single-serving version if you just want to make one glass for yourself!
Frequently Asked Questions
Q: Where can I find dried lavender and pea flowers?
A: Make sure you buy culinary-grade (food-grade) dried lavender, not the kind sold for crafts or potpourri which may have been treated with chemicals. You can find culinary lavender at specialty spice shops, health food stores, tea shops, or online through Amazon or specialty retailers. Dried pea flowers (also called butterfly pea flowers) are available at Asian grocery stores, tea shops, or online. They're optional and only for color, so if you can't find them, your lemonade will still taste amazing, it just won't have that pretty blue-purple hue. Regular lemonade color is beautiful too!
Q: Can I make the lavender syrup ahead of time?
A: Absolutely! The lavender syrup can be made up to 2 weeks ahead and stored in an airtight jar or bottle in the refrigerator. This actually makes it super convenient for entertaining since you can prep it in advance. You can also make extra and use it in other drinks like iced tea, cocktails, or drizzled over pancakes and waffles. Just make sure to strain out all the lavender flowers so they don't continue steeping and make it too strong.
Q: My lemonade tastes too much like lavender/perfume, what went wrong?
A: This usually happens if you used too much lavender or let it steep for too long. Lavender can be overpowering very quickly, so it's important to measure carefully and strain the syrup as soon as it's cooled. If your lemonade already tastes too floral, you can dilute it by adding more fresh lemon juice and plain water (not more syrup) to balance it out. Start with an extra cup of water and the juice of one more lemon, taste, and adjust from there. For next time, you can reduce the lavender to 1½ tablespoons instead of 2 for a more subtle flavor.
Q: Can I make this with honey instead of sugar?
A: Yes! Honey works beautifully in place of sugar and adds its own lovely floral notes that complement the lavender. Use the same amount (1 cup honey), and warm it gently with 1 cup of water and the lavender flowers just until the honey dissolves completely. Keep in mind that honey is sweeter than sugar and has its own distinct flavor, so your lemonade will taste slightly different but still delicious. Local honey is especially nice if you can find it. You can also use agave nectar, maple syrup, or a sugar substitute if you prefer, just adjust the sweetness to your taste.
This lavender lemonade is refreshing, elegant, and perfect for summer! Fresh lemon juice mixed with homemade lavender syrup and cold water, with optional blue pea flowers for a gorgeous purple-blue color. Floral, tart, sweet, and absolutely stunning. Makes a pitcher or a single serving!
Rate This Recipe!
Preparations
Prep Time:
10 minutes (plus cooling time)
Cook Time:
5 minutes
Total Time:
15 minutes (plus cooling time)
Cuisine:
American
Course:
Drinks
Calories:
110 kcal (approx. per serving)
Servings:
6 (or 1 single serving)
Author:
Ronica Rupan
Ingredients
Ingredients
For the Pitcher (6 servings):
- 1 cup fresh lemon juice (about 6 lemons)
- 1 cup granulated sugar
- 2 tablespoons dried culinary lavender flowers
- 6 cups water, divided (1 cup for syrup, 5 cups cold for lemonade)
- 2 tablespoons dried pea flowers (optional, for color)
- Ice, for serving
- Fresh lavender sprigs or lemon slices, for garnish (optional)
For a Single Serving:
- Juice from 1 large lemon (about 3 tablespoons)
- 3 tablespoons granulated sugar
- ½ teaspoon dried culinary lavender flowers
- 1¼ cups water, divided (¼ cup for syrup, 1 cup cold for lemonade)
- ½ teaspoon dried pea flowers (optional, for color)
- Ice, for serving
- Fresh lavender sprig or lemon slice, for garnish (optional)
Instructions
For the Pitcher Version:
- Make the Lavender Syrup In a small saucepan, combine the granulated sugar, 1 cup of water, and the dried lavender flowers. Place over medium heat and bring to a gentle simmer, stirring occasionally until the sugar has completely dissolved, about 3-5 minutes. Don't let it boil hard. Remove the pan from the heat and let the mixture cool to room temperature, about 20-30 minutes. Once cooled, strain the syrup through a fine-mesh sieve into a bowl or jar to remove all the lavender flowers. Press on the flowers gently to extract all the syrup. You now have homemade lavender syrup!
- Prepare the Pea Flower Tea (Optional) If you're using pea flowers for that beautiful blue-purple color, place the dried pea flowers in a heat-safe measuring cup or small bowl. Pour 1 cup of very hot (just-boiled) water over them and let them steep for 5-10 minutes. The water will turn a gorgeous deep blue color. Strain out the flowers and set the blue tea aside to cool.
- Juice the Lemons While the syrups are cooling, juice your lemons. You'll need about 6 large lemons to get 1 cup of fresh juice. Roll the lemons on the counter with your palm before cutting to help release more juice. Strain out any seeds.
- Mix the Lemonade In a large pitcher, combine the fresh lemon juice and 5 cups of cold water. Pour in all of your cooled lavender syrup and stir everything together really well. Taste it at this point. If you want it sweeter, you can add a bit more sugar (dissolved in a little warm water first). If it's too sweet, add more lemon juice or water.
- Add Color (Optional) If you made the pea flower tea, slowly pour it into your lemonade while stirring. Watch the color change! Add as much or as little as you want to achieve your desired shade of purple-blue. The acidity from the lemon juice will react with the blue tea and create that pretty purple color.
- Chill and Serve Refrigerate the lemonade for at least 30 minutes to get it nice and cold, or serve immediately over lots of ice in tall glasses. Garnish each glass with a fresh lavender sprig or a lemon slice on the rim. Enjoy!
For the Single Serving:
- Follow the same process but with the single-serving measurements. Make the lavender syrup with 3 tablespoons sugar, ¼ cup water, and ½ teaspoon lavender. Let cool and strain.
- If using pea flowers, steep ½ teaspoon in ¼ cup hot water for 5 minutes, then strain.
- In a large glass, combine the juice from 1 lemon, 1 cup cold water, and all the lavender syrup. Stir well.
- Add the pea flower tea if using, fill with ice, and garnish. Enjoy!
Egg Drop Soup
INGREDIENTS
- 3 eggs
- 2 tablespoons of water
- Cornstarch slurry ( 3 tbsp cornstarch mixed with 1/3 cup water until smooth)
- 1/4 cup diced carrots into small cubes
- 3 green onions Green onions, tops sliced into thin strips and the rest chopped
- 4 cups of chicken broth (homemade or store-bought)
- 1/8 tsp Salt, to taste
- 1/4 tsp White pepper, to taste
- 1/2 tsp turmeric
- 1/8 tsp sugar
- 1 tsp Sesame seed oil
INSTRUCTIONS
- Begin by cracking open three eggs into a bowl. Add two tablespoons of water and whisk until smooth.
- In a separate bowl, prepare a cornstarch slurry by mixing cornstarch with a little water until smooth.
- Dice some carrots into small cubes.
- For the green onions, slice the tops into slender strips and place them in ice water to curl. Chop the remaining parts for the soup.
- In a pot, bring four cups of chicken broth to a boil. Season with salt, white pepper, sugar, and a dash of turmeric.
- Add the diced carrots to the broth and let cook for about 3- 4 mins.
- While stirring the broth, gradually add in the cornstarch slurry to avoid clumping.
- Slowly pour the whisked eggs into the hot broth to create soft, delicate ribbons of egg.
- Finish with a drizzle of sesame seed oil and the chopped green onions.
- Serve hot, garnished with the curled green onion strips.
Enjoy this quick, delicious, and comforting Egg Drop Soup that’s sure to warm your heart and fill your stomach!
Banana Bread
INGREDIENTS
- 1.5 cups of flour
- 1 tsp baking soda
- 1/2 tsp kosher salt
- 3/4 cup unsalted butter, at room temperature
- 1 cup packed brown sugar
- 1 tsp vanilla extract
- 2 large eggs
- 3-6 bananas, the more ripe, the better
- 1 cup chocolate chips
- 1 tsp cinnamon (or to taste)
- Additional brown sugar and sliced banana for topping ( optional )
INSTRUCTIONS
- Preheat your oven to 350°F (175°C). Grease a 9×5-inch loaf pan or line it with parchment paper.
- 1n a medium bowl, whisk together the flour, baking soda, salt, and cinnamon.
- In a large bowl, use an electric mixer to cream the butter and brown sugar together until light and fluffy.
- Add the eggs to the butter mixture, one at a time, beating well after each addition. Stir in the vanilla extract.
- Mash the bananas with a fork or a potato masher until smooth. Add the mashed bananas into the butter mixture and stir until well combined.
- Gradually add the dry ingredients into the banana mixture. Stir until just combined. Do not overmix.
- Fold in the chocolate chips.
- Pour the batter into the prepared loaf pan. Sprinkle the top with additional brown sugar and place a sliced banana on top.
- Bake for 55-60 minutes, or until a toothpick inserted into the center comes out clean. If the top is browning too quickly, cover with aluminum foil.
- Remove from the oven and let the banana bread cool in the pan for 10 minutes. Then remove from the pan and let it cool completely on a wire rack before slicing and serving. Enjoy!
Cilantro Mint Tomato Salsa
INGREDIENTS
- 6 Small Roma Tomatoes cut into halves
- 1 Large White Onion cut into rounds
- 1-2 Jalapenos sliced down middle
- 2 Garlic Cloves
- ¼ cup of Rice vinegar
- ¼ cup of Chopped Fresh Cilantro
- 3 tbsp packed Chopped Fresh Mint
- 1 tbsp Kosher Salt
- 2 Limes Juiced
INSTRUCTIONS
Cut up all the vegetables and roast under the broiler skin side up, on the top rack for 10 -12 minutes. The Vegetables should be soft and a bit charred. In the food processor combine the roasted veggies and all the juices from the pan with the vinegar, cilantro, mint, lime juice, and salt, and pulse until the mixture is almost but not entirely smooth. Taste and adjust any seasonings. Refrigerate for about 2 hours before serving. Enjoy with some fresh homemade chips
Cucumber Avocado Salad with Honey Creole Vinaigrette
INGREDIENTS
- 1 large avocado, cubed
- 1 lb Persian cucumbers, chopped
- ¼ red onion, thinly sliced
- 3 tbsp fresh cilantro, chopped
Honey Creole Vinaigrette:
- 1 tbsp apple cider vinegar
- 1 garlic clove, minced
- 1 lime, juiced
- Salt, to taste
- 1 tbsp honey
- 3 tbsp olive oil
- 1 tsp Creole Kick Carnival Spice Blend
INSTRUCTIONS
- Roughly chop the cucumbers into 1-inch pieces. Transfer to a bowl and season with 1 teaspoon of salt, tossing to combine. Set aside for 30 minutes. Drain the cucumbers through a fine-mesh strainer, discarding the salty water.
- In a large bowl, combine the drained cucumbers, chopped avocado, sliced red onion, and cilantro.
- For the vinaigrette, add apple cider vinegar, minced garlic, lime juice, salt, honey, olive oil, and Creole Kick Carnival Spice Blend to a food processor or blender. Process until smooth and well-combined.
- Pour the vinaigrette over the salad and gently toss to combine, ensuring all ingredients are evenly coated.
- Serve immediately, or refrigerate for 30 minutes to let the flavors meld together. Enjoy with pan-fried salmon or your choice of protein for a complete and nourishing meal.
Garlic Parmesan Potatoes
INGREDIENTS
- 1 lb red mini potatoes, washed and halved
- 1 tsp sea salt for boiling potatoes
Parmesan Mix:
- ¾ cup freshly shredded parmesan cheese
- 4-5 cloves fresh minced garlic
- 2 tbsp melted butter
- ½ cup chopped cilantro
- 2 tsp Garlic of Eden seasoning
- 1 tsp smoked paprika
- ½ tsp sea salt, or to taste
- 3-4 tbsp olive oil
- ½ lemon, juiced
Sauce:
- ½ avocado
- ¼ cup chopped cilantro
- 2 tbsp sour cream
- ½ lemon, juiced
- 1 garlic clove
- Sea salt and black pepper, to taste
- 1.5 tbsp Garlic of Eden seasoning
- 2 tbsp olive oil
Garnish:
- ¼ cup fresh chopped cilantro
- Lemon slices
- Red chili flakes
INSTRUCTIONS
- Begin by parboiling the potatoes in a pot of water with 1 tsp of sea salt for 5-6 minutes, or until fork-tender.
- While the potatoes are boiling, prepare the Parmesan mix. In a small bowl, combine the Parmesan, minced garlic, melted butter, chopped cilantro, Garlic of Eden seasoning, smoked paprika, olive oil, and ½ tsp of salt. Mix until well combined.
- Preheat your oven to broil. Drain the potatoes and toss them in the Parmesan mix.
- Grease a baking sheet with olive oil and arrange the potatoes face-down. Broil for 5-6 minutes or until the edges begin to brown. Flip the potatoes and broil for another 5-6 minutes.
- Garnish the roasted potatoes with fresh cilantro, lemon slices, and red chili flakes.
- For the Sauce: Combine all sauce ingredients in a food processor and blend until smooth. Adjust salt and pepper as needed.
- Serve the sauce alongside the roasted garlic Parmesan potatoes for a flavor-packed experience.
Taco Cups
INGREDIENTS
- 2 tsp olive oil
- 1 lbs ground turkey or meat of choice
- ( vegetarian option: 2 cups of cooked black beans,1 orange bell pepper, and ½ onions more)
- ½ of medium onion diced
- 5 minced garlic cloves
- 1 tbsp + 1 tsp Cancun Taco Fest seasoning
- 2 tbsp of tomato paste
- ½ cup petite diced tomatoes
- ½ cup water
- ½ tsp dried oregano
- ½ tsp black pepper
- 1/2 tsp salt (to taste)
- 1 tsp of dry chili flakes
- Oil to brush on pan
- 24 wonton wrappers
- 1 1/4 cups shredded cheese
Toppings
- Mexican crema
- sliced green onions
- diced fresh tomatoes
- Salsa
- Olives
- Diced Jalapeno
- Cilantro chopped
INSTRUCTIONS
- Preheat your oven to 400F. Heat up olive oil in a large pan over med-high heat. Toss in onions and garlic and cook for 2 minutes, then add your choice of ground meat or veggies. Break up the meat with a spatula while stirring constantly. Add in diced tomatoes, tomato paste, Cancun Taco Fest seasoning, black pepper, oregano, dried chili flakes, water, and a pinch of salt to taste. Cook the meat for about 6-7 minutes or until it’s cooked through.
- Next, take a 12 cup muffin tin and lightly brush it down with oil. Take wonton wrappers and place one in the bottom of each cup. Add a Tbsp of the meat mixture into each cup, and add 1 tsp of cheese. Then, add another wonton wrapper on top of the cheese layer, and repeat the process with the remaining meat and cheese until all the muffin cups are filled up. Each tin will have 2 layers.
- Bake for around 10-15 minutes, or until the edges are crispy and the cheese is melted. Once they’re ready, take ‘em out, lightly brush the edges with light oil and top each taco cup with a dollop of Mexican crema and your desired toppings. And that’s it! Enjoy!
Salmon Wrap
INGREDIENTS
- 1 lbs of salmon
- 1/2 Lemon (to wash)
- 1 tbsp All purpose seasoning
- ½ tsp of garlic powder
- ½ tsp of onion powder
- 1 tbsp Jamaican Jerk Joy seasoning
- 1/2 tsp Black pepper
- 1 tbsp smoked Paprika
- 1 tsp Dried Thyme
- 1 tsp Dried parsley
- 1 tsp Chili flakes
- 1/4 tsp of salt
- 1 Egg
- 1/2 cup flour
- 1/2 cup Cornstarch
- 1 cup oil (for frying)
- Mango salsa
- 1 cup Cucumber
- 1/4 Red onion
- 1/2 cup Sweet bell pepper pepper
- ½ cup mango
- ¼ of scotch bonnet pepper ( to taste )
- 3 tbsp cilantro
- 1/2 Lime
- Salt to taste
- 1 tsp Olive oil
- 1/2 tsp Dry Jamaican Jerk Joy seasoning
- Glaze
- 2 tbsp Butter
- 3 cloves minced Garlic
- 1/2 tsp Thyme
- 1 tsp Wet jerk seasoning or 2 Tsp Dry Jamaican Jerk Joy
- 1/2 cup Honey
- 1/2 Lemon
- ½ Scotch bonnet (add to your taste )
- 1 tsp Parsley
- Jerk Mayo
- 2 tbsp of mayo
- 1-2 tsp of wet or dry jerk seasoning
- Spinach Tortilla wrap
- Spring mix salad
- Avocado
INSTRUCTIONS
- Preparing the mango salsa. Chop the ingredients, mix in a bowl, and refrigerate.
- Wash & pat dry the salmon. Coat it with the seasoning mixture, cover, & marinate in the refrigerator for 1-2 hours.
- When ready to cook, mix cornstarch & flour in a bowl. Coat the salmon in egg, then with the flour mixture one at a time. Let it rest on a rack for 10 minutes.
- Make the honey glaze by heating butter & adding garlic, thyme, & jerk seasoning. Add honey & lemon & allow the mixture to thicken. Add parsley & scotch bonnet pepper, then set the glaze aside.
- Fry the salmon in 350F oil for about 3 minutes per side. Remove the excess oil with a paper towel, coat the salmon with the honey glaze. Wrap the salmon in a warm tortilla with spring mix salad, mango salsa, salmon tender, avocado, & Jerk Mayo. Grill the wrap for 2 minutes per side, & serve with additional Jerk Mayo & mango salsa on the side.
BBQ chicken sliders
INGREDIENTS
- 12 dinner rolls or Hawaiian sweet rolls
- 3 cups shredded cooked chicken
- ½ cup barbecue sauce
- ½ pickled red onion, thinly sliced
- 3 tbsp of gorgonzola cheese
- 6 slices provolone or pepper jack cheese
- ½ cup fresh cilantro, finely chopped ( divided )
- 2 tablespoons butter
- 1 clove of garlic
- Sesame seeds and mini pickles for garnish
INSTRUCTIONS
- Preheat your oven to 350°F and get ready to make some delicious sliders! Begin by slicing the rolls in half lengthwise. Next, place the bottom halves in a 9 x 13-inch (23 x 33 cm) rimmed baking dish.
- In a separate bowl, mix together shredded chicken and bbq sauce, along with ¼ cup of cilantro. Spread this mixture evenly over the rolls in the baking dish, then add a layer of pickled red onion, followed by gorgonzola and Pepper Jack or provolone cheese. Top the dish off with the remaining half of the rolls.
- Brush the tops of the rolls with melted butter, garlic, and an additional ¼ cup of cilantro. Sprinkle a light dusting of salt over the tops as well. Bake the sliders, covered, for 10 minutes, then uncover and continue baking for an additional 3-4 minutes, until the bread is golden brown.
- Once finished, slice the sliders into individual portions. Garnish with sesame seeds and top with mini pickles. Serve and enjoy!
Buffalo Sauce
INGREDIENTS
- 1 cup Frank’s hot sauce ( or hot sauce of choice)
- 1/2 cup (1 stick) butter ( optional to use vegan butter)
- 1 tsp garlic powder
- 2 tsp Worcestershire
- 2 tsp apple cider vinegar
- 1/2 tsp cayenne
- ½ tsp smoked paprika
- ½ tsp onion powder
- 2 tsp water + 2 tsp cornstarch
- Salt and pepper to taste
INSTRUCTIONS
- Combine 2 teaspoons of water and cornstarch in a mixing bowl to form a mixture.
- In a saucepan, heat hot sauce, garlic powder, onion powder, smoked paprika, Worcestershire sauce, vinegar, cayenne, and salt and pepper over medium-low heat. Incorporate the cornstarch mixture and stir to combine.
- Once the sauce begins to simmer, remove from heat and add 1 tablespoon of butter. Whisk until fully incorporated. Repeat the process with another tablespoon of butter until the entire stick has been incorporated into the sauce.
- At this stage, the sauce should be rich and creamy. For additional thickness and creaminess, blend the sauce in a high-speed blender for 20 seconds. Thats it!
Crispy Buffalo Cauliflower Wings

These Crispy Buffalo Cauliflower Wings are the ultimate plant-based appetizer that even meat-eaters will devour! If you've ever had soggy, disappointing cauliflower wings, this recipe is about to change everything because the secret is in the double-dip breading technique that creates the crispiest, crunchiest coating you've ever had on cauliflower. The process starts with fresh cauliflower florets that get dipped in a tangy wet batter made with milk, hot sauce, apple cider vinegar, and Worcestershire sauce for flavor, then coated in a perfectly seasoned dry mixture of flour, rice flour, cornstarch, and spices that include garlic powder, onion powder, smoked paprika, cayenne, and black pepper. But here's where the magic happens, you dip them twice, wet then dry, then wet again and dry one more time, creating this thick, craggy coating that fries up incredibly crispy and stays that way. When you fry them at a consistent 350°F, the coating puffs up and turns golden brown with a shatteringly crisp exterior while the cauliflower inside stays tender and almost creamy. The double coating also creates all these nooks and crannies that catch the buffalo sauce perfectly when you toss them right before serving. The key is tossing them in buffalo sauce at the very last minute, if you sauce them too early, that beautiful crispy coating will get soggy and soft. Serve these hot with cool ranch or tangy blue cheese dressing for dipping, and watch them disappear faster than you can make them. They're perfect for game day, parties, as an appetizer, or anytime you want something that tastes indulgent but happens to be vegetarian or even vegan if you use plant milk and vegan Worcestershire sauce. The combination of crispy, spicy, tangy, and that cooling ranch dip makes these absolutely addictive!
Frequently Asked Questions
Q: Can I bake or air fry these instead of deep frying?
A: Yes, but the texture won't be quite as crispy as deep frying! To bake: Preheat your oven to 450°F. Place the double-coated cauliflower on a parchment-lined baking sheet, spray generously with cooking oil spray, and bake for 25-30 minutes, flipping halfway through and spraying again. To air fry: Preheat your air fryer to 400°F, spray the coated cauliflower with oil, and air fry in a single layer for 15-18 minutes, shaking the basket halfway through. Both methods work, but they'll be slightly less crispy than deep-fried. Make sure to spray generously with oil for the best results, and don't skip tossing in buffalo sauce at the very end!
Q: Why do I need to double-dip the cauliflower? Can I just do one coating?
A: The double-dip is what makes these cauliflower wings incredibly crispy with that restaurant-quality coating! A single coating will give you okay results, but it'll be thin and not as crunchy. The double coating creates a thicker, more substantial breading that fries up super crispy with lots of texture and craggy bits that hold the buffalo sauce perfectly. It also creates a barrier that keeps the cauliflower from getting soggy too quickly. Think of it like the difference between regular fried chicken and extra-crispy fried chicken, that second coating makes all the difference. It only takes an extra minute per piece and is 100% worth it for the crunch factor!
Q: My cauliflower wings got soggy after I tossed them in buffalo sauce. What did I do wrong?
A: The most common mistake is tossing the cauliflower in buffalo sauce too early! You should fry the cauliflower until golden and crispy, then toss them in buffalo sauce literally right before serving, like within 1-2 minutes of putting them on the table. If you sauce them and let them sit, the hot sauce will soak into the breading and make it soggy. Other tips: Make sure your oil temperature stays at 350°F the entire time you're frying (if it's too low, the coating absorbs more oil and gets greasy/soggy). Let the fried cauliflower drain on paper towels for just a minute to remove excess oil. Don't overcrowd the pan when frying, which can lower the oil temperature. Serve immediately after tossing in sauce!
Q: Can I prep these ahead of time for a party?
A: Yes, with some strategic planning! You can cut the cauliflower and make both the wet and dry batters up to 24 hours ahead and store them covered in the fridge. You can even coat the cauliflower pieces (double-dipped and everything) up to 2 hours ahead, place them on a baking sheet in a single layer, and refrigerate uncovered so the coating sets and stays dry. When your guests arrive, fry them fresh, this only takes 4-5 minutes per batch. You can also fry them completely up to 1 hour ahead, keep them warm in a 200°F oven on a wire rack (not covered or they'll steam and get soggy), then toss in buffalo sauce right before serving. The key is always to add the buffalo sauce at the last possible minute!
These Crispy Buffalo Cauliflower Wings are the ultimate plant-based appetizer with a secret double-dip breading technique! Cauliflower florets get coated twice in a tangy wet batter and seasoned dry mixture, then fried until golden and shatteringly crisp. Toss them in buffalo sauce right before serving and pair with ranch or blue cheese for the perfect game day snack. They're crispy, spicy, and so good that even meat-eaters will be reaching for seconds!
Rate This Recipe!
Preparations
Prep Time:
20 minutes
Cook Time:
20 minutes (frying in batches)
Total Time:
40 minutes
Cuisine:
American
Course:
Appetizer, Side Dish, Snack
Calories:
240 kcal (approx. per serving, without dipping sauce)
Servings:
4-6
Author:
Ronica Rupan
Ingredients
Ingredients
For the Cauliflower:
- 1 medium to large head of cauliflower (about 2 pounds)
- Oil for frying (vegetable oil or peanut oil work best)
- 1½ cups buffalo sauce (store-bought or homemade)
For the Dry Dip:
- ¾ cup all-purpose flour
- ¼ cup rice flour
- 1 cup cornstarch
- 2 tablespoons baking powder
- 1½ teaspoons garlic powder
- 1 teaspoon onion powder
- 1 teaspoon smoked paprika
- 1 teaspoon kosher salt
- ½ teaspoon cayenne pepper
- 1 teaspoon black pepper
For the Wet Dip:
- 1½ cups milk of choice (use plant milk like almond or oat milk for vegan)
- ½ cup hot sauce (Frank's RedHot works great)
- 2 tablespoons apple cider vinegar
- 1 tablespoon Worcestershire sauce (use vegan Worcestershire for plant-based)
- 2 tablespoons of the dry dip mixture (from above)
For Serving:
- Ranch dressing or blue cheese dressing, for dipping
- Celery sticks (optional)
- Carrot sticks (optional)
Instructions
1. Prep the Cauliflower
Remove the leaves and core from the cauliflower head. Cut the cauliflower into medium-sized florets, about 2-3 inches each. Try to keep them relatively uniform in size so they cook evenly. You should get about 20-25 pieces from one large head. Pat the florets dry with paper towels to remove excess moisture, this helps the coating stick better.
2. Make the Dry Dip
In a large, shallow bowl or baking dish, whisk together the all-purpose flour, rice flour, cornstarch, baking powder, garlic powder, onion powder, smoked paprika, salt, cayenne pepper, and black pepper. Mix thoroughly until all the spices are evenly distributed throughout the flour mixture. Set aside. Reserve 2 tablespoons of this dry mixture for the wet dip.
3. Make the Wet Dip
In another large, shallow bowl, whisk together the milk, hot sauce, apple cider vinegar, Worcestershire sauce, and 2 tablespoons of the dry dip mixture you just made. Whisk until smooth and well combined. The mixture should be the consistency of thin pancake batter. The dry mix helps thicken it slightly and adds flavor.
4. Set Up Your Breading Station
Arrange your station in this order from left to right: raw cauliflower, wet dip bowl, dry dip bowl, and a clean baking sheet or plate for the coated cauliflower. This assembly line makes the double-dipping process much easier and less messy.
5. Double-Dip the Cauliflower (First Round)
Take one cauliflower floret and dip it completely in the wet dip, making sure it's fully coated. Let any excess drip off for a second. Then immediately place it in the dry dip, turning and pressing gently to coat all sides. Tap off any excess dry coating. Place the coated floret on your clean baking sheet.
6. Double-Dip Again (Second Round)
Now take that same piece and dip it back into the wet dip, coating it completely again. Let excess drip off. Then coat it one more time in the dry dip, pressing gently to create that thick, craggy coating. Tap off excess and return to the baking sheet. Repeat this entire double-dipping process with all the cauliflower florets. This double coating is what creates that incredibly crispy texture!
7. Heat the Oil
Pour about 2-3 inches of oil into a large, heavy-bottomed pot or Dutch oven. Heat the oil over medium-high heat until it reaches 350°F on a deep-fry or candy thermometer. This temperature is crucial, don't skip checking it! If you don't have a thermometer, test by dropping a tiny bit of batter in, it should sizzle immediately and float to the top.
8. Fry in Batches
Working in batches of 4-5 pieces (don't overcrowd the pot or the temperature will drop), carefully lower the coated cauliflower into the hot oil using a slotted spoon or spider strainer. Fry for 4-5 minutes, turning occasionally with tongs or a slotted spoon, until the coating is deep golden brown and crispy all over. The cauliflower should be tender inside when pierced with a fork.
9. Drain and Keep Warm
Remove the fried cauliflower with a slotted spoon and transfer to a paper towel-lined plate or wire rack to drain excess oil. Keep the finished batches warm in a 200°F oven on a wire rack while you fry the remaining cauliflower. Between batches, check that your oil temperature is back to 350°F before adding more cauliflower.
10. Toss in Buffalo Sauce
Right before serving (this is important, don't do it earlier!), place all the fried cauliflower in a large bowl. Pour the buffalo sauce over the top and toss gently but thoroughly until every piece is coated in sauce. The timing is crucial here, if you sauce them too early, they'll get soggy!
11. Serve Immediately
Transfer the sauced cauliflower wings to a serving platter. Serve immediately while they're hot and crispy with ranch or blue cheese dressing on the side for dipping. Add celery and carrot sticks if you want the classic buffalo wing experience. Enjoy while they're at their crispiest!
Herb-Marinated Roasted Chicken with Vegetables
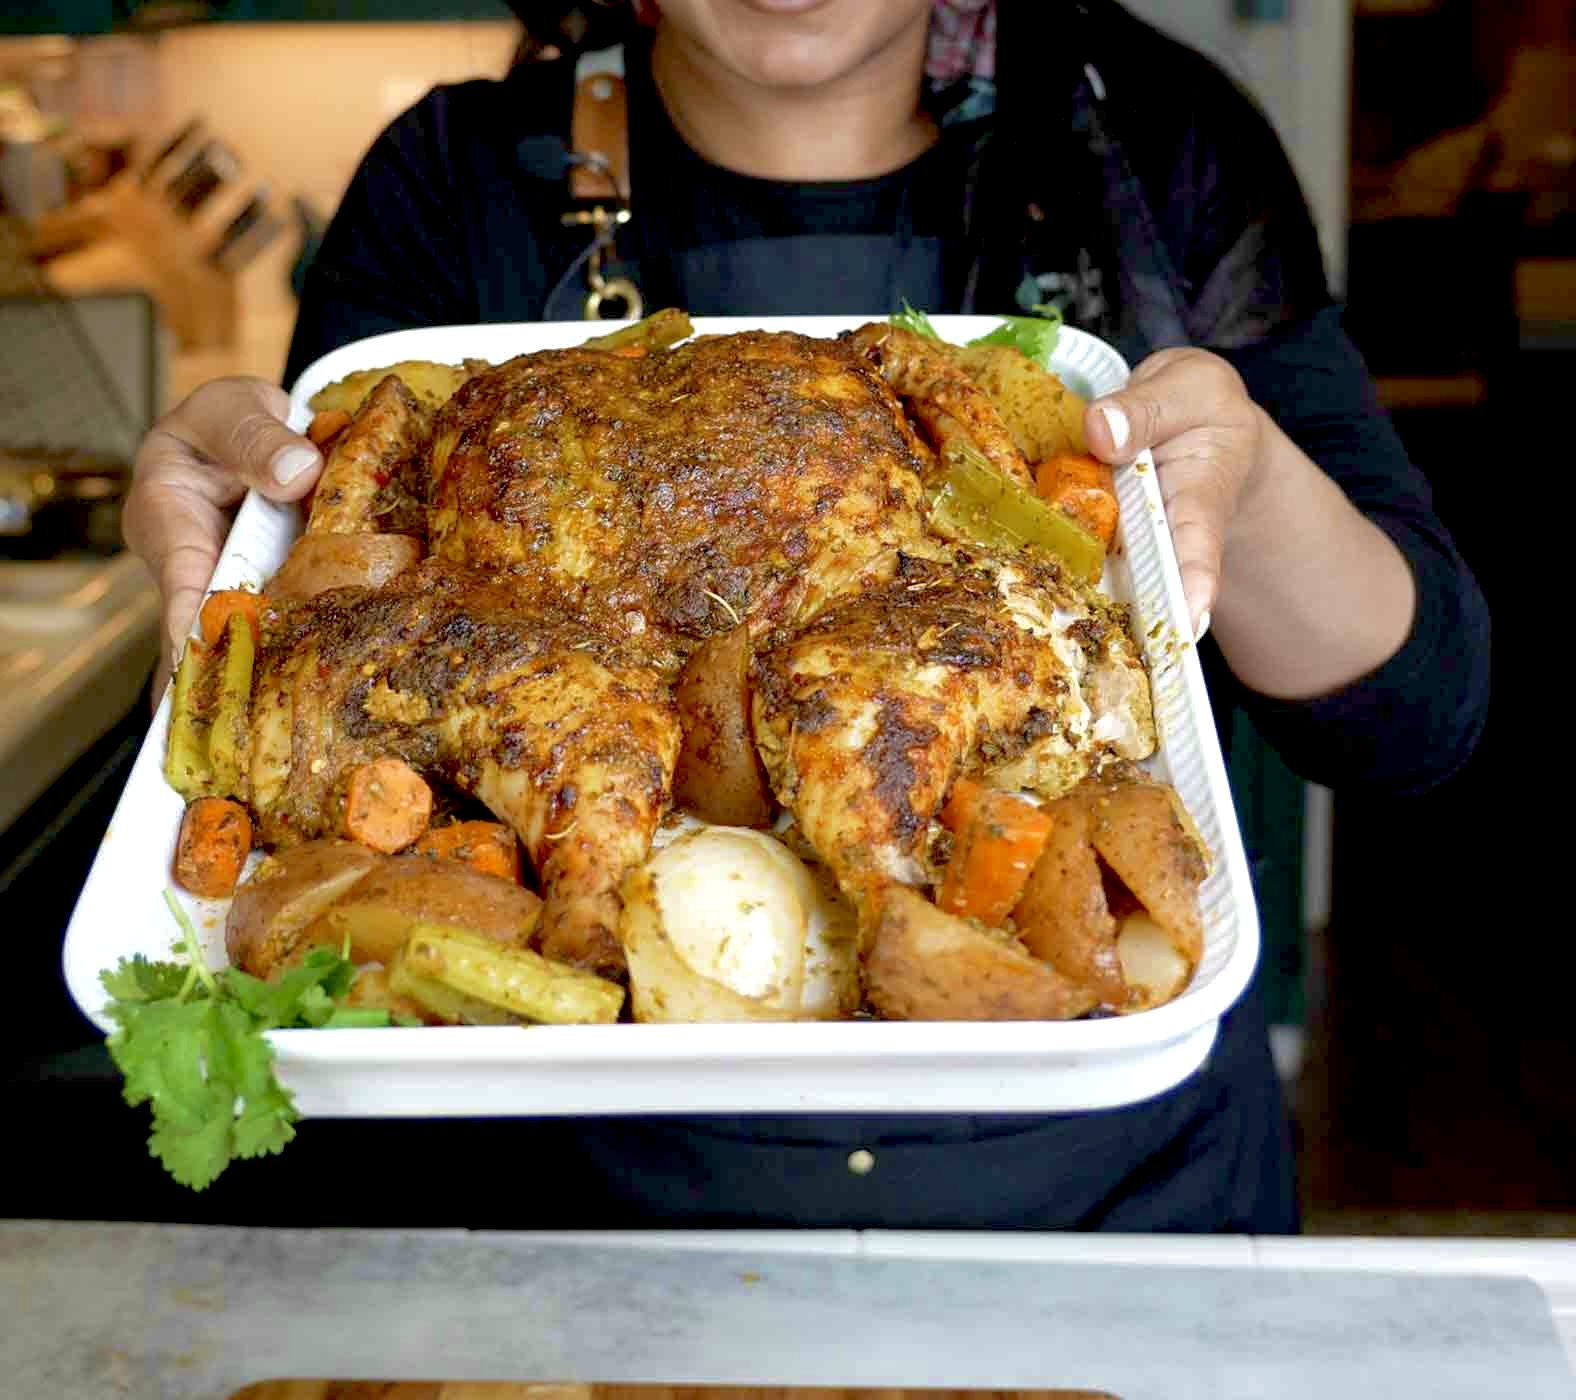
This Herb-Marinated Roasted Chicken with Vegetables is the ultimate Sunday dinner that fills your house with the most incredible aromas! A whole chicken gets spatchcocked (butterflied) for even cooking, then marinated in a vibrant green herb marinade that's packed with fresh parsley, cilantro, green onions, thyme, garlic, serrano peppers, and warm spices like smoked paprika, chili powder, and cumin. The marinade is blended until smooth and massaged all over the chicken, including under the skin where you'll also tuck pats of butter that melt and baste the meat from the inside as it roasts. After marinating for at least 4 hours or overnight (the longer the better for maximum flavor penetration), the chicken roasts on a wire rack over a bed of red potatoes, carrots, onions, celery, and garlic that soak up all the delicious drippings and marinade while they cook. The vegetables get tossed in some of that same herb marinade and chicken broth, so they're incredibly flavorful and tender. The chicken roasts covered first at a lower temperature to cook through gently and stay juicy, then you crank up the heat, uncover it, and let the skin get golden, crispy, and caramelized while you brush it with the pan juices and melted butter every 20-30 minutes. The result is a chicken with perfectly crispy, flavorful skin, meat that's so tender and juicy it falls off the bone, and vegetables that are caramelized, buttery, and have soaked up all those incredible herb and chicken flavors. This is the kind of meal that brings everyone to the table, makes your house smell amazing, and creates those perfect Sunday dinner memories. Serve it family-style straight from the roasting pan with crusty bread to soak up all the delicious pan juices!
Frequently Asked Questions
Q: What does spatchcocking mean and why should I do it?
A: Spatchcocking (also called butterflying) means removing the backbone of the chicken and flattening it out so it lays flat in the roasting pan. This technique is a game-changer because it allows the chicken to cook much more evenly, the dark meat and white meat finish at the same time instead of the breasts overcooking while waiting for the thighs to be done, it reduces cooking time by about 30-40%, and it creates more surface area for that crispy, golden skin. To spatchcock: Place the chicken breast-side down. Using kitchen shears or a sharp knife, cut along both sides of the backbone and remove it completely. Flip the chicken over and press down firmly on the breastbone to flatten it. If you're not comfortable doing this yourself, ask your butcher to spatchcock it for you, most will do it for free!
Q: Can I marinate the chicken for longer than overnight?
A: Yes, but there's a limit! The chicken can marinate for up to 24 hours for maximum flavor, and that's actually ideal. The acids in the marinade (vinegar and lemon juice) help tenderize the meat and the herbs penetrate deeply. However, don't marinate for longer than 24 hours because the acids can start to break down the meat too much and make the texture mushy rather than tender. If you only have 4 hours, that still works and will give you good flavor, but overnight (8-12 hours) to 24 hours is the sweet spot. Make sure to massage the marinade really well and create those holes in the chicken so it penetrates deeply, not just coats the surface.
Q: Why do you cook it covered first, then uncovered?
A: This two-stage cooking method is the secret to juicy meat with crispy skin! Cooking covered at a lower temperature (365°F) for the first hour traps moisture and steam, which keeps the chicken incredibly juicy and helps it cook through gently without drying out. It's like creating a little mini-oven environment that braises the chicken slightly. Then, you increase the temperature to 385°F and uncover it for the last 30-45 minutes, which allows the skin to dry out, crisp up, and turn golden brown and delicious. If you roasted it uncovered the whole time at high heat, the skin would be crispy but the meat might dry out. This method gives you the best of both worlds, juicy, tender meat AND crispy, flavorful skin! idunt mauris.
Q: How do I know when the chicken is done and safe to eat?
A: Always use an instant-read meat thermometer to check for doneness, never rely on cooking time alone since oven temperatures vary! Insert the thermometer into the thickest part of the thigh (not touching bone) and the thickest part of the breast. The chicken is safe to eat when both areas reach an internal temperature of 165°F. The juices should run clear, not pink, when you pierce the meat. If you don't have a thermometer, you can check by piercing the thigh with a knife, the juices should run clear and the meat should no longer be pink near the bone. However, a thermometer is the most reliable way to ensure food safety. Let the chicken rest for 10 minutes after removing from the oven before carving, this allows the juices to redistribute and keeps the meat even juicier!
This Herb-Marinated Roasted Chicken with Vegetables is the ultimate comfort dinner! A spatchcocked whole chicken gets marinated in a vibrant blend of fresh herbs, garlic, serrano peppers, and warm spices, then roasted over potatoes, carrots, and vegetables that soak up all the delicious drippings. Butter tucked under the skin keeps everything incredibly juicy while the outside gets golden and crispy. It's the perfect Sunday dinner that makes your house smell amazing!
Rate This Recipe!
Preparations
Prep Time:
30 minutes
Marinating Time:
4 hours to overnight (minimum 4 hours)
Cook Time:
1 hour 45 minutes
Total Time:
6 hours 15 minutes (including minimum marinating time)
Cuisine:
Latin-inspired, American
Course:
Main Course, Dinner
Calories:
450 kcal (approx. per serving)
Servings:
4-6
Author:
Ronica Rupan
Ingredients
Ingredients
For the Herb Marinade:
- 1 red onion, roughly chopped
- 8 garlic cloves, peeled
- 1 cup fresh parsley, chopped
- 1 cup fresh cilantro, chopped
- 6 pieces green onion, roughly chopped
- 15 sprigs fresh thyme, stems removed (about 2 tablespoons fresh thyme leaves)
- 1-2 serrano chili peppers (adjust to heat preference)
- 4 tablespoons olive oil
- 3 tablespoons white vinegar or apple cider vinegar
- 2½ teaspoons kosher salt
- ½ teaspoon black pepper
- 1 teaspoon red chili flakes
- 2 teaspoons chili powder
- 1½ tablespoons smoked paprika
- 1 teaspoon garlic powder
- 1 teaspoon onion powder
- 1 teaspoon dried parsley
- 1 teaspoon dried thyme
- Juice of ½ lemon (about 1-2 tablespoons)
- 1 teaspoon all-purpose seasoning
For the Chicken:
- 1 whole chicken (about 4-5 pounds)
- 1 lemon, for washing
- 6 tablespoons unsalted butter, softened and divided
- Additional salt, black pepper, garlic powder, and paprika for seasoning
For the Vegetables:
- 5 red potatoes, cut into chunks
- 4 medium carrots, peeled and cut into chunks
- 1 yellow onion, cut into wedges
- 4 celery stalks, cut into chunks
- 4 whole garlic cloves, peeled
- ½ cup chicken broth
Instructions
1. Make the Herb Marinade
Add all the marinade ingredients to a blender or food processor: red onion, garlic cloves, fresh parsley, cilantro, green onions, fresh thyme leaves, serrano peppers, olive oil, vinegar, salt, black pepper, chili flakes, chili powder, smoked paprika, garlic powder, onion powder, dried parsley, dried thyme, lemon juice, and all-purpose seasoning. Blend on high speed until completely smooth and vibrant green, about 1-2 minutes. Scrape down the sides as needed. Taste and adjust seasoning if needed. Transfer the marinade to a bowl and reserve about ⅓ cup (about 5-6 tablespoons) in a separate container for the vegetables later. Set aside.
2. Spatchcock the Chicken
Place the whole chicken breast-side down on a cutting board. Using sharp kitchen shears or a heavy knife, cut along both sides of the backbone, starting from the tail end and cutting all the way up to the neck. Remove and discard the backbone (or save it for making stock). Flip the chicken over so it's breast-side up. Press down firmly on the breastbone with both hands to flatten the chicken completely. It should lay flat like a butterfly. This allows for even cooking and more surface area for that crispy skin!
3. Clean the Chicken
Fill a large bowl or your sink with cold water. Add the juice of 1 lemon and a splash of vinegar. Place the spatchcocked chicken in the lemon-vinegar water and rinse it thoroughly inside and out. This helps remove any impurities and gives the chicken a fresh, clean flavor. Drain the chicken well and pat it completely dry with paper towels, both inside and out. The drier the skin, the crispier it will get when roasting.
4. Prepare the Chicken for Marinating
Using a sharp knife or fork, poke holes all over the chicken, creating small slits in the meat (not just the skin). Go deep enough to penetrate the meat but don't go crazy. These holes allow the marinade to penetrate deeply into the chicken rather than just coating the surface. Make holes in the breasts, thighs, drumsticks, and anywhere there's thick meat.
5. Marinate the Chicken
Place the spatchcocked chicken in a large roasting pan, large baking dish, or extra-large zip-top bag. Pour the herb marinade all over the chicken, reserving that ⅓ cup you set aside earlier for the vegetables. Use your hands to massage the marinade into every part of the chicken, making sure it gets into all those holes you created, under the wings, and coating every surface. Really work it in there! Cover the pan tightly with plastic wrap or seal the bag. Refrigerate for at least 4 hours, but overnight (8-12 hours) or up to 24 hours is even better for maximum flavor.
6. Preheat the Oven
When you're ready to cook, preheat your oven to 365°F (185°C). Position a rack in the middle of the oven.
7. Prepare the Vegetables
Cut the red potatoes into large chunks (about 2-inch pieces). Peel and cut the carrots into 2-inch chunks. Cut the onion into thick wedges. Cut the celery into 2-inch pieces. Peel the garlic cloves and leave them whole. Place all the vegetables in a large roasting pan. Add the reserved herb marinade you set aside earlier and toss the vegetables to coat them completely. Spread them out in an even layer on the bottom of the roasting pan.
8. Set Up the Chicken
Place a wire rack over the vegetables in the roasting pan. If you don't have a wire rack that fits, you can place the chicken directly on top of the vegetables, but a rack allows better air circulation. Remove the marinated chicken from the refrigerator. Carefully loosen the skin from the breast meat by sliding your fingers underneath, being careful not to tear the skin. Take 3-4 tablespoons of the softened butter and spread it under the skin, directly on the breast meat. This keeps the breast meat incredibly moist and bastes it from the inside. Place the chicken on the wire rack over the vegetables, breast-side up and spread out flat.
9. Season and Add Butter
Lightly season the top of the chicken with a sprinkle of salt, black pepper, garlic powder, and smoked paprika. Don't go too heavy since the marinade is already seasoned. Place the remaining 2-3 tablespoons of butter in small dabs on top of the vegetables around the pan. Pour the ½ cup of chicken broth over the vegetables (not on the chicken). This creates steam and keeps everything moist while adding flavor to the vegetables.
10. Roast Covered
Cover the entire roasting pan tightly with aluminum foil, making sure it's sealed well to trap the moisture. Place in the preheated 365°F oven and roast covered for 1 hour. During this time, the chicken will cook through gently while staying incredibly juicy.
11. Increase Temperature and Uncover
After 1 hour, increase the oven temperature to 385°F (195°C). Carefully remove the roasting pan from the oven and remove the foil (watch out for the hot steam!). The chicken should already be mostly cooked and the vegetables should be tender. Return the uncovered pan to the oven.
12. Roast Uncovered and Baste
Roast uncovered for 30-45 minutes, basting the chicken every 20-30 minutes. To baste: Use a spoon or baster to scoop up the pan juices, melted butter, and any marinade from the bottom of the pan, and drizzle it all over the chicken. Be gentle so you don't brush off the marinade coating on the skin, just add more liquid on top. This keeps everything moist and helps the skin turn golden and crispy. The chicken is done when the skin is deep golden brown and crispy, and the internal temperature reaches 165°F.
13. Check Internal Temperature
After 30-45 minutes of uncovered roasting (1 hour 30 minutes to 1 hour 45 minutes total cooking time), check the internal temperature. Insert an instant-read thermometer into the thickest part of the thigh (not touching bone) and into the thickest part of the breast. Both should read 165°F. If not, continue roasting in 5-10 minute increments, checking the temperature each time, until it reaches 165°F. Food safety is crucial!
14. Rest the Chicken
Once the chicken reaches 165°F, remove the roasting pan from the oven. Tent the chicken loosely with foil and let it rest for 10 minutes before carving. This resting time allows the juices to redistribute throughout the meat, making every bite juicier. Don't skip this step!
15. Serve
Transfer the chicken to a cutting board and carve it into pieces, or serve it whole family-style. Arrange the roasted vegetables on a serving platter and place the carved chicken on top or alongside. Spoon some of the pan juices over everything. Serve immediately with crusty bread to soak up all those incredible juices!
Avocado Toast
INGREDIENTS
- Grilled Wheat sourdough bread
- Garlic sauce spread
- Chimichurri spread
- Avocado
- Tomatoes
- Microgreens
- Salt and pepper
Samosas
DOUGH
- 2 cups all-purpose flour
- 1/2 tsp salt
- 6 tbsp vegetable oil
- 3/4 cup water +( 2 tbsp if needed)
FILLING
- Filling:
2 cups chopped red potatoes
3/4 cup frozen peas and carrots, thawed
1/4 cup finely chopped onion
1 tbsp minced fresh ginger
5 cloves minced fresh garlic
¼ tsp ground cumin
½ tsp cumin seeds
¼ tsp coriander
½ tsp ground turmeric
1/4 tsp ground red pepper
¼ tsp kosher salt
1/2 tsp curry powder
½ tsp garam masala
¼ cup cilantro
3 tbsp olive oil for cooking
vegetable oil for frying
INSTRUCTIONS
- For the dough, mix the flour and salt in a medium bowl. Slowly add the oil and water, mixing with your hands until a smooth dough forms. Cover the dough with plastic wrap and let it rest for 30 mins.
- For the filling, heat oil in a large saucepan over med heat. Add the cumin seeds, onion, ginger, and garlic; and cook until the onion is translucent. Stir in the spices and cook for 1 min. Add the potatoes and 2 tbsp of water and cook covered till soft. Make sure to stir occasionally. Next add peas, and carrots and cook until heated through. Remove off heat, stir in the cilantro, and let the filling cool.
- Divide dough into 8 sections. Roll out the dough in a circle on a lightly floured surface until it’s translucent and thin. Cut in half. And fold into cones. Use water to seal the sides. Place about 2 tablespoons of the filling into the cone. Fold the dough over the filling to form a triangle and press the edges to seal.
- To fry the samosas, heat the oil in a saucepan over medium heat to 350F°. Add the samosas and cook until golden brown (about 3-4 minutes). Drain on a paper towel and serve hot with your favorite dipping sauce. I love to pair mine with tamarind sauce!
Honey Peach Ginger Ale
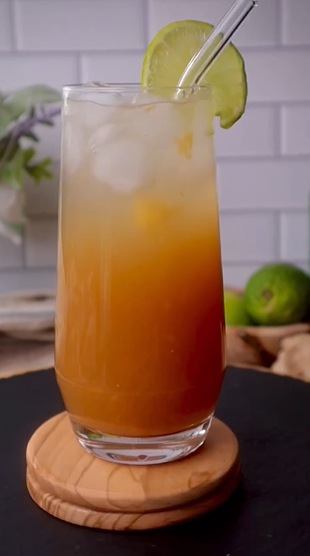
This Honey Peach Ginger Ale is refreshing, naturally sweetened, and so much better than anything store-bought! Fresh ginger gets simmered with lime zest to create this spicy, aromatic concentrate that's packed with flavor and all the good-for-you benefits of ginger. The homemade ginger syrup gets mixed with muddled fresh peaches for natural sweetness and a beautiful peachy color, honey for that smooth sweetness, fresh lime juice for brightness, and bubbly carbonated water to bring it all together. The result is this perfectly balanced drink that's sweet, tangy, spicy, and incredibly refreshing. What makes this recipe so great is that you can make a big pitcher for parties or customize individual glasses based on everyone's sweetness preference, some people like it sweeter, others prefer it less sweet with more ginger bite. The ginger concentrate can be made ahead and stored in the fridge, so when you're ready for a drink, you just muddle some peaches, add the concentrate, honey, ice, and top it with carbonated water. It's the kind of drink that cools you down on hot days, helps with digestion thanks to the ginger, and feels fancy enough to serve at barbecues, brunches, or any time you want something more interesting than plain soda. Plus, it's naturally caffeine-free and can easily be adjusted to be as sweet or spicy as you like!
This Honey Peach Ginger Ale is refreshing, naturally sweetened, and so much better than store-bought! Fresh ginger gets simmered with lime zest to create a spicy, aromatic base, then mixed with muddled peaches, honey, and bubbly carbonated water for the perfect balance of sweet, tangy, and zingy. It's the kind of drink that cools you down on hot days and feels special enough to serve at gatherings. Make a big batch or customize each glass to your sweetness preference!
Rate This Recipe!
Preparations
Prep Time:
10 minutes
Cook Time:
15 minutes
Steep Time:
15 minutes
Total Time
40 minutes
Cuisine:
American
Course:
Drinks
Calories:
120 kcal (approx. per serving)
Servings:
6-8
Author:
Ronica Rupan
Ingredients
Ingredients
For the Ginger Concentrate:
- 1 cup fresh ginger, peeled and chopped or grated
- 3 cups water
- Zest of 1 lime
- Juice of 1 lime (about 2 tablespoons)
For Serving (per glass):
- 2 tablespoons fresh peaches, mashed or muddled
- ⅓ cup ginger concentrate (from above)
- 3 tablespoons honey (or to taste)
- Ice cubes
- 1 cup carbonated water or club soda
- Lime wedges, for garnish
Instructions
1. Make the Ginger Concentrate
In a medium saucepan, bring 3 cups of water to a boil. Add the grated or chopped ginger and lime zest. Reduce the heat to low and let it simmer for 15 minutes. The water should turn golden and aromatic from the ginger.
2. Steep and Cool
Remove the saucepan from the heat and let the ginger mixture steep for another 15 minutes. This allows the ginger flavor to continue infusing into the water. Strain the mixture through a fine-mesh sieve into a bowl or pitcher, pressing on the ginger to extract all the liquid. Discard the ginger solids and lime zest. Stir in the fresh lime juice and let the ginger concentrate cool completely. You can speed this up by placing it in the refrigerator.
3. Prepare Individual Servings
To make one glass, add 2 tablespoons of fresh mashed or muddled peaches to the bottom of a tall glass. Use a muddler or the back of a spoon to really mash the peaches and release their juices and flavor.
4. Add Ginger Concentrate and Honey
Pour ⅓ cup of the cooled ginger concentrate over the muddled peaches. Add 3 tablespoons of honey (start with less if you prefer it less sweet, you can always add more). Stir well until the honey is completely dissolved.
5. Add Ice and Carbonated Water
Fill the glass with ice cubes. Pour 1 cup of carbonated water or club soda over the ice, stirring gently to combine everything without losing too much fizz.
6. Garnish and Serve
Garnish with a lime wedge on the rim of the glass. Give it one final gentle stir and serve immediately with a straw. Enjoy this refreshing, spicy-sweet drink!
For a Large Pitcher:
Muddle 1 cup of fresh peaches in the bottom of a large pitcher. Add the entire batch of cooled ginger concentrate, 1 cup of honey (adjust to taste), and stir until the honey dissolves. Add ice and 6-8 cups of carbonated water just before serving. Garnish with lime wedges.
Salted Caramel Sauce
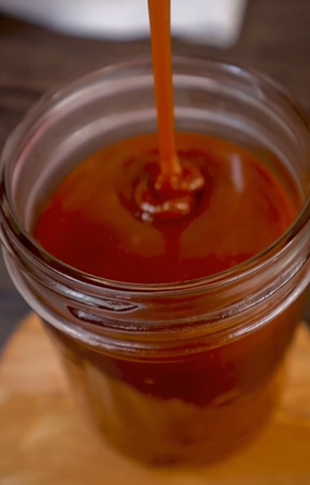
This Homemade Salted Caramel Sauce is rich, buttery, and dangerously delicious! It's the kind of sauce you'll want to drizzle on absolutely everything, vanilla ice cream, brownies, pancakes, apple slices, or straight into your morning coffee for a fancy latte moment. The combination of deep caramelized sugar, butter, cream, and a touch of flaky sea salt creates this perfectly balanced sauce that's sweet, slightly salty, and completely addictive. The best part? It takes just 20 minutes to make and tastes a million times better than anything store-bought. Once you make this, you'll always keep a jar in your fridge!
This Homemade Salted Caramel Sauce is rich, buttery, and dangerously delicious! Drizzle it on ice cream, brownies, pancakes, or stir it into your coffee. The combination of caramelized sugar, butter, cream, and flaky sea salt creates the perfect sweet-salty balance. It takes just 20 minutes to make and tastes way better than store-bought!
Rate This Recipe!
Preparations
Prep Time:
2 minutes
Cook Time:
15 minutes
Total Time:
10 minutes
Cuisine:
27 minutes
Course:
American
Calories:
120 kcal (approx. per 2 tablespoons)
Servings:
About 1½ cups
Author:
Ronica Rupan
Ingredients
Ingredients
- 1 cup granulated sugar
- ¼ cup water
- 6 tablespoons unsalted butter, cut into pieces
- ½ cup heavy cream, at room temperature
- 1 teaspoon vanilla extract
- Pinch of flaky sea salt (plus more for topping if desired)
Instructions
1. Combine Sugar and Water
In a medium heavy-bottomed saucepan, mix together the granulated sugar and water. Stir just until the sugar is moistened and looks like wet sand. This helps the sugar dissolve evenly.
2. Dissolve the Sugar
Place the saucepan over medium heat. Stir occasionally until the sugar completely dissolves and the mixture starts to bubble, about 3-4 minutes. Once it starts bubbling, stop stirring! From this point on, you can gently swirl the pan if needed, but no more stirring or the sugar may crystallize.
3. Caramelize
Continue cooking over medium heat without stirring, just gently swirling the pan occasionally to ensure even cooking. Watch closely as the mixture thickens and transforms from clear to golden to a deep amber color, like honey, this will take 8-12 minutes. The color tells you everything, you want a rich amber, not too light (won't have enough flavor) and not too dark (will taste bitter). Remove from heat as soon as you hit that perfect amber color.
4. Add the Butter
Immediately add the butter pieces to the hot caramel. The mixture will bubble up vigorously, so be careful! Whisk constantly until the butter is completely melted and incorporated into the caramel. It will look smooth and glossy.
5. Add the Cream
Remove the pan from the heat. Slowly pour in the heavy cream while whisking continuously. The caramel will bubble up again, this is normal! Keep whisking until all the cream has been incorporated and the sauce is smooth and uniform in color. If you see any lumps, just keep whisking, they'll dissolve.
6. Finish with Vanilla and Salt
Whisk in the vanilla extract and a pinch of flaky sea salt. Taste and add more salt if you like it saltier, I love a good balance of sweet and salty!
7. Cool and Store
Let the caramel sauce cool in the pan for about 10 minutes, it will thicken as it cools. Then pour it into a clean glass jar or container. Allow it to cool completely to room temperature before covering and storing in the refrigerator. The sauce will thicken more as it chills.
8. Serve and Enjoy
Drizzle this gorgeous caramel sauce over ice cream, cakes, brownies, pancakes, waffles, apple slices, or stir it into your coffee. You can even eat it by the spoonful, I won't judge!
Banana Pudding

This Better Than Anything Banana Pudding is rich, creamy, and lives up to its name! Forget the boxed pudding mix, this one is made completely from scratch with silky homemade vanilla pudding that gets folded together with fluffy whipped cream, sweetened cream cheese, and fresh chopped bananas for the creamiest, dreamiest texture. The layers are what make this special, a buttery Nilla wafer crumble on the bottom, sliced bananas for sweetness, the luscious pudding mixture, and more cookies and bananas on top. It all comes together in a trifle dish that looks absolutely stunning, especially when you top it with those luxurious edible gold leaf sheets that make it feel like a special occasion dessert. The pudding is light but indulgent, not too heavy, with the perfect balance of vanilla, banana, and that satisfying cookie crunch in every spoonful. This is the dessert that'll have everyone asking for the recipe and coming back for seconds. It does need a few hours to chill and set, so plan ahead, but trust me, it's worth the wait!
This Better Than Anything Banana Pudding is rich, creamy, and absolutely show-stopping! Made-from-scratch vanilla pudding gets folded with fluffy whipped cream, sweetened cream cheese, and fresh bananas, then layered with Nilla wafer crumble and cookies. It's light, indulgent, and way better than any banana pudding you've ever had. Top it off with edible gold leaf for a dessert that looks as impressive as it tastes!
Rate This Recipe!
Preparations
Prep Time:
30 minutes
Cook Time:
5 minutes
Chill Time:
5-6 hours (2-3 hours for pudding + 3 hours assembled)
Total Time
6 hours 35 minutes
Cuisine:
Southern American
Course:
Dessert
Calories:
450 kcal (approx. per serving)
Servings:
12-14
Author:
Ronica Rupan
Ingredients
Ingredients
For the Homemade Pudding:
- 1 cup cane sugar
- ¼ cup cornstarch
- ¾ teaspoon kosher salt
- 2 cups whole milk
- 1¼ cups heavy cream
- 1 large egg, beaten
- 1 tablespoon vanilla extract
- 1 teaspoon vanilla bean paste
- ¼ teaspoon turmeric (for natural golden color, you won't taste it)
For the Whipped Cream:
- 3 cups heavy cream, cold
- 1 teaspoon vanilla bean paste
For the Cream Cheese Mixture:
- 1 (14-ounce) can sweetened condensed milk
- 8 ounces cream cheese, softened to room temperature
For the Nilla Wafer Crumble:
- 2 cups Nilla wafers (about 50-60 cookies)
- ¼ cup unsalted butter, melted
For Assembly and Topping:
- 7 medium ripe bananas (3 chopped small for inside pudding, 3-4 sliced for layers and topping)
- 1 box mini Nilla wafers
- 1 bag mini Chessmen cookies
- Edible gold leaf sheets (optional, but gorgeous!)
Instructions
1. Make the Homemade Pudding
In a medium-sized saucepan, whisk together the sugar, cornstarch, and salt until well combined. Add the milk and heavy cream, whisking until smooth. Add the beaten egg and whisk everything together. Place the pan over medium heat and cook, whisking constantly, until the mixture starts to bubble. This is important, don't stop whisking or it might form lumps! Once it's bubbling, continue whisking and let it cook for 30 seconds. The pudding should be thick enough to coat the back of a spoon. Remove from heat and whisk in the vanilla extract, vanilla bean paste, and turmeric. The turmeric just adds a beautiful golden color without affecting the taste.
2. Chill the Pudding
Transfer the pudding to a bowl and press plastic wrap directly onto the surface of the pudding to prevent a skin from forming. Refrigerate for 2-3 hours until completely chilled and set.
3. Make the Whipped Cream
When you're ready to assemble, pour the cold heavy cream and vanilla bean paste into a large bowl or stand mixer. Beat on medium-high speed until stiff peaks form, about 3-4 minutes. The cream should hold its shape when you lift the beaters. Set aside in the refrigerator.
4. Make the Cream Cheese Mixture
In a separate large bowl, beat together the softened cream cheese and sweetened condensed milk using a hand mixer or stand mixer until completely smooth and creamy with no lumps, about 2-3 minutes.
5. Combine Everything
Add the chilled pudding to the cream cheese mixture and beat until well combined and smooth. Now gently fold in the whipped cream using a spatula, being careful not to deflate it. You want to keep it light and fluffy. Once the whipped cream is incorporated, fold in the 3 chopped bananas.
6. Make the Nilla Wafer Crumble
Add the 2 cups of Nilla wafers to a food processor and pulse until they're finely ground into crumbs. Add the melted butter and pulse a few more times until the crumbs are moistened and hold together when pressed. If you don't have a food processor, you can put the cookies in a sealed plastic bag and crush them with a rolling pin, then mix with the butter in a bowl.
7. Layer the Pudding
Grab a large trifle dish or a 9x13-inch baking dish. Start by pressing the Nilla wafer crumble into the bottom to create an even layer. Next, add a layer of mini Nilla wafers standing up around the sides if using a trifle dish, or just scattered on top of the crumble. Add a layer of sliced bananas, then spread about a third of the pudding mixture over the bananas. Repeat the layers, mini wafers, sliced bananas, pudding, for 2-3 layers total, ending with the pudding mixture on top.
8. Chill Again
Cover the dish with plastic wrap and refrigerate for at least 3 hours, or overnight if possible. This chilling time allows the cookies to soften and all the flavors to meld together beautifully.
9. Top and Serve
Just before serving, top the banana pudding with mini Chessmen cookies, fresh sliced bananas, and if you're feeling fancy, delicate pieces of edible gold leaf for that wow factor. Scoop into bowls and enjoy this creamy, dreamy dessert!
Blackened Berbere Salmon
INGREDIENTS
- Spice mix: Use pre-grounded spices or ground them yourself.
- 3 tbsp smoked paprika
- 1 tbsp red pepper flakes
- 2 tsp cumin
- 1 tsp coriander
- 1 tsp cardamom
- 1 tsp turmeric
- 1 tsp Himalayan salt
- 1 tsp fenugreek
- 1 tsp black pepper
- 1/2 tsp cloves
- 1/2 tsp allspice
- 1/2 tsp ginger
- 1/2 tsp cinnamon
East African Lentils
- 1 cup Green Lentils
- 3 cups veggie or chicken broth
- 2 ½ cups diced onions
- 8 cloves garlic, minced
- 1 ½ tbsp fresh ginger, minced
- 1 cup diced carrot
- 1 cup diced tomato
- 1 tbsp of tomato paste
- 3 tbsp Berbere Spice Mix
- 1 tsp Himalayan salt
- 4 tbsp olive oil
Blacked Berbere Salmon
- 1 lb of salmon
- 2 Tbsp of Berber spice mix
- Olive oil
- ½ Tsp Himalayan Salt
Garnish
- Fresh Italian parsley
- Fresh cilantro
- Slices of lemon
- Viburnum Coral Tuile
INSTRUCTIONS
- Spice mixture: Either use ground spices or ground them yourself. Mix all spices together and set aside.
- Lentils: In a large pot, saute onions, carrots, garlic, & ginger in olive oil until tender (5 mins). Add 3 tbsp of the Berbere spice mixture. Saute for 2 mins & add broth, lentils, diced tomatoes, salt, & tomato paste. Bring to a boil, reduce heat to a simmer, cover. Allow cooking till tender (30 mins). Make sure to check to mix when needed. Uncover, cook off any extra liquid.
- Salmon: Cut into 3-inch slices, coat with olive oil & spice mixture. Cook on an iron skillet on med-high, 2-3 mins, flip to the skin side cook 3-4 mins.
- Make a bed of lentils & add salmon on top & garnish!
Pickled Onions Cucumber Salad
Sumac Pickled Onions:
-
Ingredients:
- 1 medium red onion, thinly sliced
- 1.5 tsp sumac
- 2 tbsp lemon juice
- 1/8 tsp salt
-
Instructions:
- Combine all ingredients in a bowl, ensuring the onion slices are well coated.
- Let the mixture rest in the refrigerator for 30 minutes to marinate.
Cucumber and Parsley Salad with Sumac Pickled Onions:
-
Ingredients:
- ½ cup of the prepared Sumac Pickled Onions
- 1 tbsp sesame seeds, toasted
- 1 lb Persian cucumbers
- 1 tsp salt, plus ¼ tsp for the dressing
- 1½ cups parsley leaves
- 1 garlic clove
- 5 tbsp olive oil
-
Instructions:
- Prepare the cucumbers by washing them and then lightly bruising with the back of a knife. Slice them lengthwise, remove the seeds with a spoon, and chop into 1-inch pieces.
- Toss the cucumber pieces with 1 tsp salt and set aside for 30 minutes to draw out moisture.
- Drain and discard the excess water from the cucumbers.
- In a food processor, blend the parsley leaves, garlic, olive oil, and ¼ tsp salt until smooth to create the dressing.
- In a mixing bowl, combine the drained cucumbers, pickled onions, and about ¼ cup of the parsley dressing. Mix well and adjust the dressing to taste.
- Sprinkle toasted sesame seeds over the salad before serving.
Storage:
- Store any remaining pickled onions and dressing in separate airtight containers in the refrigerator. Enjoy within 3 days.