
Cookie Monster Ice Cream Bars Recipe
Posted on November 4, 2025
0 Comments
Share this recipe


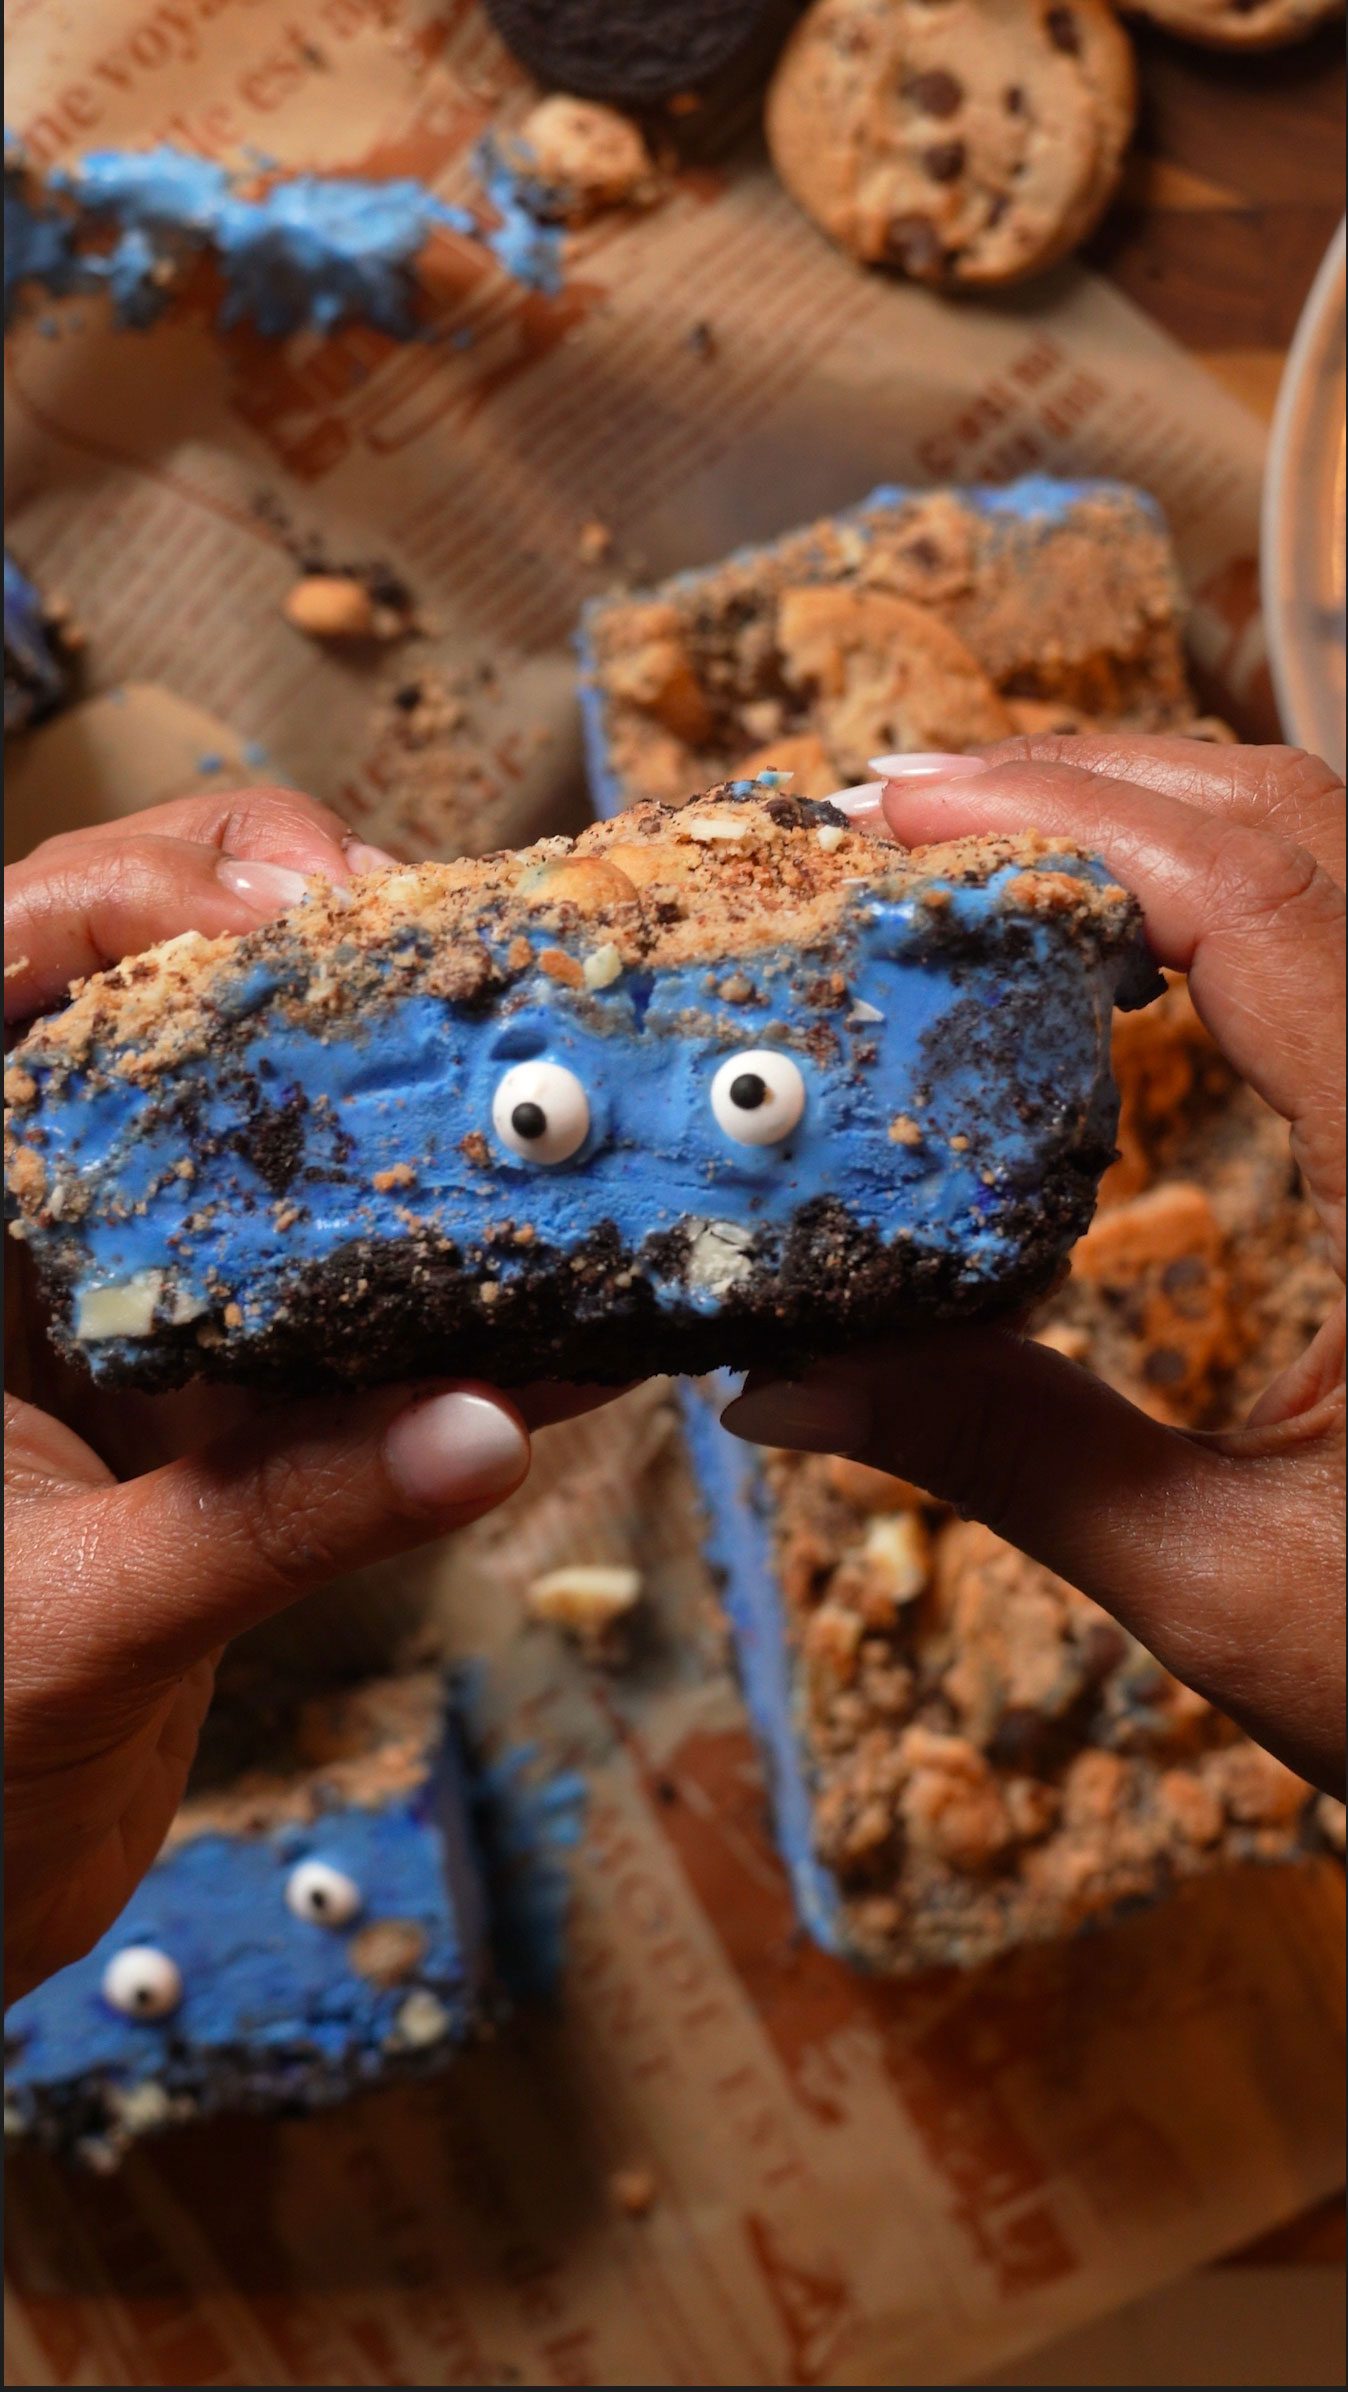
These Cookie Monster Ice Cream Bars are fun, colorful, and packed with cookie goodness! With a crunchy Oreo crust on the bottom, creamy blue vanilla ice cream naturally colored with spirulina, and chocolate chip cookies on top, every bite is a sweet adventure. Easy enough for the kids to help make and naturally delicious—these homemade ice cream bars are way better than anything from the store.
Key Ingredients

1. Heavy Whipping Cream
Heavy whipping cream is the foundation of this no-churn ice cream, creating that rich, creamy texture without needing an ice cream maker. When whipped to stiff peaks and folded with sweetened condensed milk, it gives you that perfect soft, scoopable consistency that stays smooth even after freezing.
2. Blue Spirulina Powder
Blue spirulina is what gives these bars that vibrant Cookie Monster blue—naturally! It's a plant-based powder made from algae, packed with antioxidants, and has a very mild taste that won't overpower your ice cream. No artificial dyes needed, making this a fun treat you can feel good about serving to the kids.
3. Oreo Cookies
Oreos form the crunchy bottom crust that holds everything together. Mixed with melted butter and pressed into the pan, they create that classic cookies-and-cream base that everyone loves. Keep the cream filling in for extra flavor and easier prep.
4. Candy Eyeballs
hese fun little candy eyes are what make this recipe truly Cookie Monster-worthy! They add pops of color, a bit of crunch, and make the bars incredibly playful and kid-friendly. You can find them in the baking aisle, and the kids will love folding them into the ice cream.
5. Mini Chocolate Chip Cookies
Mini chocolate chip cookies scattered throughout the ice cream give you those delicious cookie chunks in every bite. They stay slightly soft when frozen, adding texture and that nostalgic cookies-and-cream vibe we all grew up loving.
Step-by-Step Instructions
Step 1. Prepare the Oreo Crust In a bowl, combine 12-15 crushed Oreo cookies (keep the cream filling in) with 3 tablespoons melted butter. Mix until the cookies are evenly coated. Press this mixture firmly into the bottom of an 8x8 inch pan lined with parchment paper. Place the pan in the freezer while you make the ice cream.
Step 2. Whip the Cream In a large bowl using an electric mixer, whip 2 cups of cold heavy whipping cream on high speed for 3-4 minutes until stiff peaks form. Be careful not to over-whip or it may become grainy.
Step 3. Make the Ice Cream Base Gently fold the sweetened condensed milk, 2 teaspoons vanilla extract, and ¼ teaspoon salt into the whipped cream. Add ½ to ¾ teaspoon blue spirulina powder gradually, starting with less and adding more until you reach your desired Cookie Monster blue color. Fold gently to keep the mixture light and fluffy.
Step 4. Add the Mix-Ins Fold in 1 cup chopped mini chocolate chip cookies and ½ cup candy eyeballs. Be gentle so you don't deflate the whipped cream. You can also add white chocolate chips at this stage if using.
Step 5. Assemble the Bars Remove the pan from the freezer. Pour half of the ice cream mixture over the Oreo crust. Sprinkle a few extra mini cookies and candy eyeballs in the middle layer. Add the remaining ice cream mixture and smooth the top.
Step 6. Add the Cookie Topping Roughly chop 8-10 chocolate chip cookies, mix with 2 tablespoons melted butter, and sprinkle them over the top. Add white chocolate chips if desired.
Step 7. Freeze Cover the pan tightly with plastic wrap or aluminum foil. Freeze for at least 6-8 hours or overnight until completely firm.
Step 8. Slice and Serve Remove from freezer and let sit for 5-10 minutes to soften slightly. Use the parchment paper to lift the entire block out of the pan. Cut into bars with a sharp knife, dipping the knife in warm water between cuts for cleaner slices. Serve immediately and enjoy!
Frequently Asked Questions
Can I make these ice cream bars ahead of time?
Absolutely! These bars are perfect for meal prep. You can make them up to a week in advance and store them covered in the freezer. For longer storage, wrap individual bars in plastic wrap to keep them fresh.
Can I use regular food coloring instead of blue spirulina?
Yes, you can use blue gel food coloring if you prefer. Start with a small amount (about ¼ teaspoon) and add more until you reach your desired shade. Gel food coloring works better than liquid because it won't thin out the ice cream mixture.
Do I need an ice cream maker for this recipe?
Nope! This is a no-churn ice cream recipe, which means you just need a mixer to whip the cream and a freezer. No special equipment required, making it super easy and accessible for everyone.
Can I substitute the candy eyeballs with something else?
Of course! If you can't find candy eyeballs or want to skip them, you can use mini M&Ms, chocolate chips, or even mini marshmallows. The recipe is flexible, so feel free to use whatever fun mix-ins your family loves.
These Cookie Monster Ice Cream Bars are fun, festive, and loaded with cookie goodness! With a crunchy Oreo crust, naturally blue spirulina-colored ice cream, and chocolate chip cookies on top, every bite is pure nostalgia. Easy enough for kids to help make and completely dye-free, this is your new favorite homemade frozen treat.
Rate This Recipe!

Preparations
Prep Time:
30
Freeze Time:
6-8 hours
Total Time:
6 hours 30 minutes (with freezing)
Cuisine:
American
Course:
Dessert
Calories:
320kcal (approx. per serving)
Servings:
12-16 bars
Author:
Ronica Rupan
Ingredients
Cookie Monster Ice Cream Bars (No-Churn, Naturally Colored)
These Cookie Monster ice cream bars are fun, festive, and loaded with cookie goodness! With a crunchy Oreo crust, naturally blue spirulina-colored ice cream, and chocolate chip cookies on top, every bite is pure nostalgia. Easy enough for kids to help make and completely dye-free—this is your new favorite homemade frozen treat.
These Cookie Monster ice cream bars are fun, festive, and loaded with cookie goodness! With a crunchy Oreo crust, naturally blue spirulina-colored ice cream, and chocolate chip cookies on top, every bite is pure nostalgia. Easy enough for kids to help make and completely dye-free—this is your new favorite homemade frozen treat.
Ingredients:
For the Ice Cream Base:
- 2 cups heavy whipping cream, cold
- 1 (14 oz) can sweetened condensed milk
- 2 teaspoons vanilla extract
- 1/4 teaspoon salt
- 1/2 to 3/4 teaspoon blue spirulina powder
For the Mix-ins:
- 1 cup mini chocolate chip cookies, roughly chopped
- 1/2 cup candy eyeballs
- Optional: 2 tablespoons mini marshmallows
For the Bottom Crust (Oreos):
- 12-15 Oreo cookies, crushed into chunks
- 3 tablespoons butter, melted
For the Top Layer (Chocolate Chip Cookies):
- 8-10 chocolate chip cookies (like Chips Ahoy), roughly chopped
- Optional: 1/4 to 1/2 cup white chocolate chips
Instructions:
Prepare the Oreo Crust:
- Line your pan: Line an 8x8 inch square pan with parchment paper, leaving overhang on the sides for easy removal later.
- Make the crust: Crush 12-15 Oreo cookies into chunky pieces (keep the cream filling in). Mix with 3 tablespoons melted butter until evenly coated.
- Press and freeze: Press the Oreo mixture firmly into the bottom of the pan. Place in the freezer while you make the ice cream.
Make the No-Churn Ice Cream:
- Whip the cream: In a large bowl using an electric mixer, whip 2 cups cold heavy whipping cream on high speed for 3-4 minutes until stiff peaks form. Don't over-whip or it may become grainy.
- Fold in the base: Gently fold in the sweetened condensed milk, vanilla extract, and salt. Be gentle to keep the mixture light and fluffy.
- Add the color: Gradually add blue spirulina powder, starting with 1/2 teaspoon and adding more until you reach that perfect Cookie Monster blue. The color will deepen slightly as it freezes.
- Mix in the goodies: Fold in chopped mini chocolate chip cookies and candy eyeballs. Add mini marshmallows or white chocolate chips if using.
Assemble the Bars:
- Layer the ice cream: Remove the pan from the freezer. Pour half of the ice cream mixture over the Oreo crust and spread evenly.
- Add a middle layer: Sprinkle a few extra mini cookies and candy eyeballs over the ice cream.
- Top it off: Pour the remaining ice cream on top and smooth it out.
- Finish with cookies: Roughly chop 8-10 chocolate chip cookies, mix with 2 tablespoons melted butter, and sprinkle them over the top. Add white chocolate chips if desired.
Freeze and Serve:
- Freeze: Cover the pan tightly with plastic wrap or aluminum foil. Freeze for at least 6-8 hours or overnight until completely firm.
- Slice: Remove from freezer and let sit 5-10 minutes to soften slightly. Use the parchment overhang to lift the entire block out. Cut into bars with a sharp knife, dipping it in warm water between cuts for clean slices.
- Enjoy: Serve immediately and watch them disappear!
Let's Talk Ingredients: Why They Matter
1. Heavy Whipping Cream Heavy whipping cream is the secret to no-churn ice cream magic. When whipped to stiff peaks, it creates air pockets that give you that creamy, scoopable texture without needing an ice cream maker. Make sure it's cold before whipping for best results.
2. Blue Spirulina Powder Blue spirulina gives these bars that vibrant Cookie Monster blue naturally—no artificial dyes needed. It's made from algae, packed with antioxidants, and has such a mild taste you won't even notice it. Start with less and add more until you love the color.
3. Sweetened Condensed Milk This is what sweetens the ice cream and keeps it creamy even when frozen. It also helps prevent ice crystals from forming, so you get smooth, soft ice cream bars every time.
4. Oreo Cookies Oreos make the perfect crunchy bottom crust. Keep the cream filling in—it adds flavor and helps bind everything together with the melted butter. Crush them into chunks, not powder, for the best texture.
5. Candy Eyeballs These fun little candy eyes are what make this recipe truly Cookie Monster-approved! They're playful, colorful, and kids absolutely love folding them into the ice cream. You'll find them in the baking aisle near sprinkles and decorating supplies.
6. Chocolate Chip Cookies Mini chocolate chip cookies throughout and regular-sized ones on top give you those delicious cookie chunks in every bite. They soften slightly when frozen, adding that nostalgic cookies-and-cream texture we all grew up loving.
More Recipes


Connect with Us on Social Media:



Hey! It’s Ronica!
This is where I love to share my passion for cooking, baking, and flavor. When I’m not creating delicious recipes, you’ll find me spending time with my family, working on my spice blends at Flora & Mana, or enjoying a homemade baked goods. Join me on this culinary journey to taste, healthy meals and fun kitchen hacks!
Read MoreWe'd Love to Hear from you!
Drop a Comment Below!
Leave a Reply
Get recipes first!
Subscribe now to get exclusive recipes, kitchen tips, and cooking inspiration delivered straight to your inbox.
No comments yet